STEP 8: TURN THE TUBING INTO A SOAKER HOSE
Use a small nail or thumbtack to make holes along the section of hose that is sitting on the pad. The holes you make should be spaced out about 2 per inch. That way they'll evenly drip water onto the pad while the pump is running.
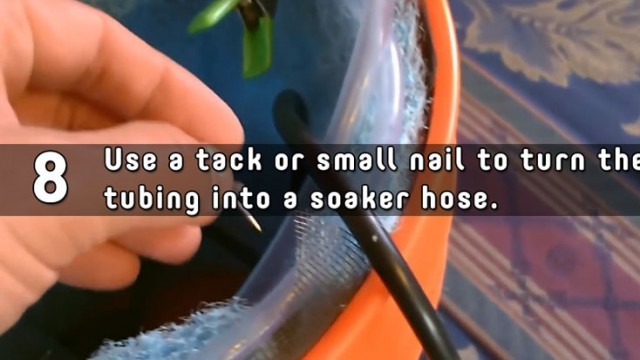
It's important to take note of the drip rate that's shown on the video, which will give you a good idea as to what you should aim for. The ultimate goal is to have the water drop gradually onto the pad and not have the hose squirt or spray water.
The parts and materials from the list will give you a good basis so that you can build your own conditioner. However, each step may turn out a little bit differently, and the performance of your unit will depend on which parts you have and also what the humidity is in the room you are trying to cool down. Take note that the drier and warmer the surrounding air is, the more you will feel the cool air.
SUMMARY OF THE VIDEO
The amazing thing about this project is it that you can adapt it to the materials and parts that you already own. During the video, you'll see how nice it is using power from a DC battery source or solar power rig.
Some quick tips: Use a permanent marker to show on the side of the bucket where the water level should be. Marking where the maximum water level is will make refilling it a lot easier. Also, don't forget to remove the screen and pad and dry them out when you're not using the fan. Otherwise, the damp environment will become a breeding home for bacterial growth. No one wants mold in their house!
Watch the video below and enjoy seeing how this incredible project comes together:
This may make you feel cooler but actually adds heat to a room (remember to cool you have to transfer the heat somewhere else). You can make a two bucket system with two fans, one set inside and one out that would actually cool, but you have to connect then through a wall or window somehow.
Justin Havok Hamill
Del Hagley II
Kenny Feazell
Your back up for Monica Moosbrugger
Hey that’s no joke. I actually built one of those last year and bought the copper, water pump, etc to Julie another one here just in case. Lol
If it works build it!!!!
Th copper tubing one is certainly the way to go
I just need to pick up a box or oscillating fan and good to go.
Use it as a Steele in the winter…
Uh I don’t partake any longer bro but yea it wouldn’t take much to make one.
Didn’t work
Yea that’ll end well
We used one where i used to work in va. Feels about 5 to 10 degrees cooler. Its a swamp cooler and when its 90+ makes it feel a little better but its not an air conditioner and uses the water quickly.
Swamp cooler, not air conditioner. It puts humidity into the air, which makes things worse here in the south
Arlis Hall III
Quick question…… if your in a blackout , where do you get the ice !?
It’s not A/C, it’s a swamp cooler. They can be useful, so long as you don’t have high humidity already.
It’s not A/C, it’s a swamp cooler. They can be useful, so long as you don’t have high humidity already.
Yeah during a blackout I’ll just go out and get myself a shovel full of snow
These dont work.
Tyler Nelson Lonnie Garrett
Max Miller
If you have power then why not just run a window unit ac?
If you don’t you soon will have running this
Stick some ice in your pants, works better and no hassle
They don’t create high humidity, but they will raise it up to normal levels in especially dry areas. They use evaporation for cooling, so as long as the water is evaporating, it’s cooling. 🙂
Douglas Funk
where does one find ice in a black out
people please stop sharing this stupid thing.
More like an evaporative cooler.
Jesse Peterson
Uhm,
Only works in dry places, not in humid climates like you’d need. Also, I’ve made a few ice A/Cs different methods, and they are very inefficient. A whole cooler of ice barely cools a small cab pickup for maybe an hour before it all melts. Best bet is to find a way to run coil through whole… large blocks. Still were fun to make though.