Someone once said that bacon was the “candy of meats” and American consumption of the product indicate that most of us agree.
Being able to pressure can bacon for use in a survival situation (or even regular use if you can enough of it) can ensure that you have access to bacon's savory wonderfulness whenever you need it.
1. Prepare plain brown paper. It is recommended that you get it a foot wide or maybe even more depending on the amount of bacon that you are planning to can. Plain brown paper will work well because they are not too thick so it will be easier for you to place the bacon inside the jar.
2. Place the paper on a flat surface. Place as close as you possibly can. You know that you are doing it correctly if you have one neat role of bacon all together. Make sure that the bacon does not overlap with each other since this can cause problems when you are placing the bacon inside the can.
3. Trim down the excess paper. Make sure that you have enough just to cover the bacon.
4. Cover the bacon again with another paper that is of the same length.
5. Starting from one side of the bacon, you have to roll the bacon with the paper slowly. You have to remember that you need to tuck each time you roll. You need to roll until you reach the end of the bacon line that you have created.
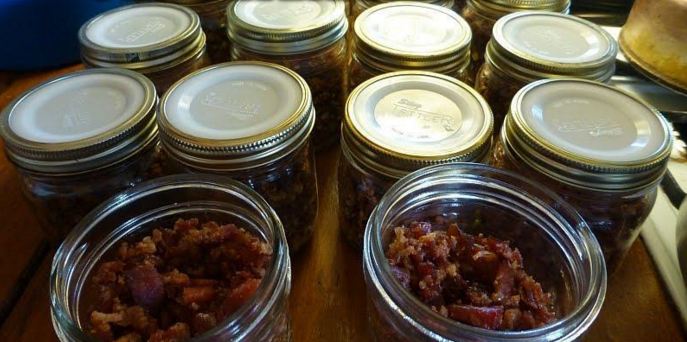
6. Once you have rolled down all the bacon slices with the paper, you need to fit the bacon inside the jar. If it won’t fit, you may choose to unroll and remove one bacon slice and try again.
7. Once you have already placed all the bacon inside the jar, you have to place the lid of the jar tightly.
8. Place the jars inside the canner of the pressure cooker. Place the lid and fasten the lid of the pressure cooker. Make sure that it is secure.
9 You have to make use of a gauge to ensure that the pressure inside the cooker is just right.
10. You have to make sure to cook the bacon inside the jars for approximately 90 minutes to 1 hour and 30 minutes.
11. After you have cooked the bacon just enough, you would have to remove each jar from the cooker that you have used. If you see some liquid inside the jar, this is normal because this is the fat and grease from the bacon. It will start to turn white once it cools down.
12. Once the jars containing the bacon have cooled down, you have to check if they have sealed properly. One of the reasons why you are recommended to use a mason jar is because of the dip in the middle of the lid that will dip down if the pressure inside the jar has been established. If you do not see this sign, it is highly likely that the jar has not been sealed properly.
13. Label the jars and store in a cool, dry place. Do remember that for canned bacon, you may use it for about 6 – 8 months although some people who are already experts at canning say that they are able to use it even after a year. This can be highly beneficial for you.
14. To enjoy your bacon, you have to take out the paper with the bacon and get the slices that you need. It might be a bit hard to remove in the beginning but it will remove even with the grease and fat of the bacon trying to stop you from doing so. Remove any traces of the brown paper before you fry the bacon to be sure.
When talking about canned foods, pressure canned bacon does not immediately come to mind.
If you follow the instructions above, however, you can can bacon and ensure you have it for use during a survival situation – or even in a pinch if you cannot get out to the store to buy bacon.
To see more tips on canning bacon and other canning advice, please visit Authorized Boots.
Lenny Lapham!!! get busy
Melissa Freeman
This is how you preserve all meats.
Tori Moody Blair
Jayson
Lisa Turnbow Root , Mmmm yummy!
Aged and cured bacon….. Hmmm. The possibilities!!!!
I’ll fire mine up.
Your welcome
Paul Thiesen
I’m not really sure leftover back even exists
Trina
Brad Koenig
I would rather just eat it 🙂
And when the apocalypse hits I will be king with all my canned bacon!
Teresa Smith …