If we were ever facing a situation where traditional lumber cutting and shaping equipment was rendered useless, the only choice we would have in building something would be to do it by hand, ourselves.
That task probably seems daunting and it is, but it is not as complicated as it might seem at first review (although it would be backbreaking.)
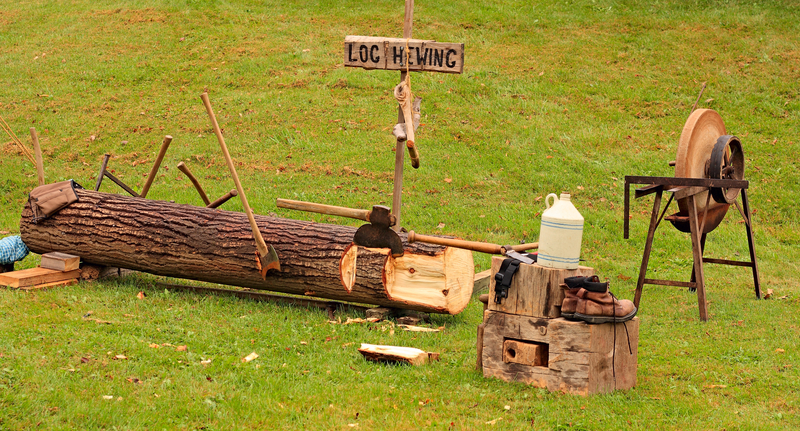
Hewing Timber by Hand
Lay Out Dimensions
Cut both ends of the log perpendicular with a saw. Now you have a smooth surface to lay out the dimensions of your timber on opposite ends of the log.
Start the lay out at the top end of the log (smallest diameter). Measure and mark the center of the log with your ruler and pencil. This may not be in the pith of the tree. Place your level on the mark and draw a plumb line down the middle of the log. Measure over from that line your desired width and make a mark. If you’re finished timber width is 10 inches, this mark would be 5 inches from the center mark. Repeat this layout on the opposite side of the center mark. Use the level to mark both of these vertical plumb lines.
For a 10 x 10 inch square timber, measure and mark from the center line up 5 inches and down 5 inches. Draw the top and bottom lines level. All four lines should be drawn to the edge of the log.
Repeat this lay out on the butt end of the log.
Snap Chalk Lines
Strip or flatten the bark off the log where your chalk line will be snapped. I use my felling ax for this step. Cut a notch or slice on the pencil line at the top edge of the log. Secure your line on the end of the log and run the line through the notch, down the length of the log, and through the other corresponding line notch at the opposite end. Secure the line and snap the chalk line.
Snap the line by lifting and releasing the string vertically. This will create a plumb line down the length of the log. This is the plane you will follow for a squared off timber. Note: If you lift the line out away from the log, your plane will not match your layout on the end of the log.
Scoring
Slash scoring is done by making a series of overlapping ax cuts down the length of the log. These slash cuts are angled (30-40 degrees) into the log and about 3 inches apart down the side of the log. A sharp felling ax with a 36 inch handle is what I use. The longer handle makes reaching the bottom side of the plumb line “easier.” There’s really nothing easy about hand-hewing timber.
Slash scoring, in my experience, is best when there is not a lot of wood to be removed to reach the line. With more than a couple of inches to be removed, juggling works better for me.
Juggling
You’re now ready to remove the joggles or the slashes, depending on the scoring method used. For simplicity sake, I’ll describe the method for removing joggles.
Either way, this step holds the most potential for injury. The reason being, if your juggling on the ground, is that your making powerful vertical ax strokes which are not backed up in your frontal zone.
You can remove jogs while standing on the ground. With the log to your left, place your right foot forward and about two feet to the right of the log. Your left foot should be well behind your body with the left leg braced on the log.
I’ve also removed joggles by standing on the opposite of the log. This is very safe but requires that you turn the log at an angle so you can reach the joggles with your ax. This also means the log must be repositioned to plumb before hewing. On smaller diameter logs, straddling the log is an option.
When the joggles are removed, there should be about a half-inch of wood proud of the chalk line. This remaining wood will be removed in the next step.
Hewing
Hewing to the line transforms a round log into square timber. The hewing swing is not a full ax stroke. It’s mostly performed through forearm movement. Hewing is best performed with a circular slicing motion on each swing.
Stand with the log to the left of your body for right handers. Place your right foot forward and away from the log with your left foot back. Brace your left leg against the log for stability. Grip the ax handle right hand forward and left to the rear. The forward hand should be close (6-8 inches) to the ax head.
Start from the top of the log and work towards the butt end. Begin with gentle strokes on the line to separate the remaining wood. Continue to raise and lower the ax in a controlled manner as you follow this kerf to the bottom of the log.
The process described above is repeated on the remaining three sides of the log.
To hew the opposite side of the log, remove one log dog and reattach it on the hewn side of the log.
The good news is it is possible to create lumber at the dimensions you need if a true, long-term survival situation ever arose; the bad news is most of us would need intensive care to recuperate from having to create it.
Kidding aside, the process is not that difficult and if it was the only viable option, those who could do it would have a pretty amazing bartering skill!
To learn about cutting your own lumber to the size you need, check out Survival Sherpa.
I love this stuff. Just one of many skills you should know if stf happens
Hard$#%&!@*work, that’s for sure.
Whats the moonshine jug for…lol
Paul Stockwell
These skills can be learned at north Bennet street school in Boston Massachusetts. Preservation carpentry
Hey Kelly Dotson
Nate Nathan Rinehart