We're going to list the instructions below. But if it sounds confusing, don't be overwhelmed. We included a video at the bottom to help bring it all together.
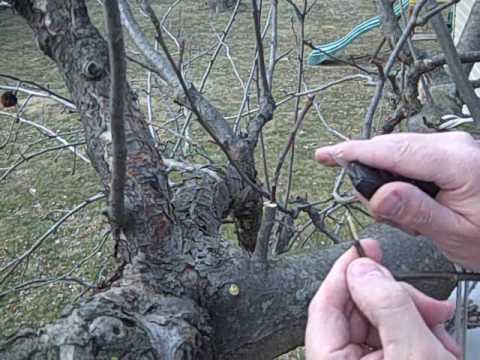
1. Cut the host branch—Make as clean a cut as you can, perpendicular to the branch. Leave a stump just two or three inches long. For very thin branches (a half inch is about the thinnest it’s practical to graft onto),With a saw, cut about three quarters of the way through from one side, then remove the saw from the cut, flip it, and finish the cut from the other side.
2. Split the host branch—Use a sharp knife, align the blade across the center of the stump, and gently rock it while pressing it into the cut end. I try to split along a line that’s perpendicular to the trunk branch from which the stump grows. For a narrow stump, make the split about and inch long. For a heavier stump, it might take a three-inch split to provide enough play to get scions into the crack.
3. Make a scion—Whittle a scion from the harvested grafting stock. Start at a leaf bud three-to-seven inches from the terminal bud of a twig. Whittle a wedge starting at that leaf bud and getting narrower toward the bottom of the scion. The wedge—from leaf bud to the end of the scion—should be about a half inch long (see photos).
4. Insert the scion into the stump—Spring the crack open and work the whittled wedge into one side of it. The leaf bud at the top of the wedge should point out, and end up aligned with the top of the stump. I use the point of my utility knife to spring the stump open. If you do this, be cautious; when you flex it too much, the knife blade will break.
5. Add a second scion—Whittle a scion to match the first one and work it into the other end of the crack in the host stump. Chances are, you won’t need to flex the crack open this time as the first scion will hold it wide enough for the second scion to fit. You may need to readjust both scions several times to make sure their bark aligns with the host stump’s bark.
6. Wrap the graft—I learned that you can coat a new graft with wax, then wrap it with grafting tape to protect it from the elements. This requires heating the wax which seems inconvenient, especially on a cold day.
I use cotton twine and tree wound dressing. Tie the twine around the stump at the bottom of the crack (I use a clove hitch, but any knot will do). Then, wrap the twine around the stump, working toward the leaf buds on the scions, and laying each successive loop of twine tightly against the preceding loop.
7. Waterproof the wrap—Use a water-based tree wound dressing, and coat the cotton twine wrapping.
We loved this tutorial from Small Kitchen Garden and found it very helpful. In this scenario she decided to mix up her apple trees by combining both red and green apples. But that made us wonder what kind of fruit we'd like to mix and match in our own garden. Do you have any suggestions or ideas of your own?
As promised, here is the video tutorial of grafting in action!
Just remember that Daniel has been doing this for quite some time. If you have not done this before, we recommend that you wear some protective gloves to ensure your hands are safeguarded from the knives or blades you'll be using.
That’s a good idea
@[671024141:2048:Ryan Salmeri]
Amazing
@[1057175046:2048:Heather Leicht]
It’s not a truck. It’s only weird to people with zero horticulture experience. Stop with the clicks bait, or I will not click through, and I will post alternate links with explanations. The truly curious do not need our intelligence insulted.
Guess people don’t learn about grafting in science classes anymore.
I believe it’s called grafting and people have been doing it for many many years!