Just think, once the oven is built you can prepare and bake crusty breads, tasty pizzas and even roast meats! Just the thought of it make ones mouth water!
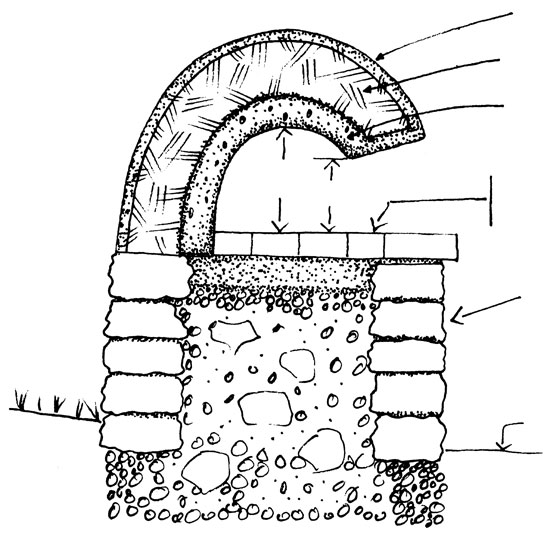
To start, prepare a base for the oven. If you’re going to use the oven a lot, you’ll want to build the oven floor at waist-height. Use what you have — rocks, broken-up concrete, logs, old metal barrels or even sawhorses. If you don’t mind working low, build on the ground.
The Wood-Fired Oven Floor
Twenty to 27 inches is a good size to the oven floor, but to determine your exact needs make a mock-up of what you want to bake and calculate how much space it takes. Make your oven floor by setting standard red or fire bricks on a level bed of smooth, tamped sand, 4 to 6 inches deep. Used bricks are great, but should be free of old mortar. Set the first one level and solid. Hold the next brick level and just above the sand; gently kiss its long side to the long side of the previous one. Set it down flat and firm. Don’t wiggle it. If one brick stands up a bit proud, tap it down to make it flush with the rest.Make a Form
Shape a pile of moist sand on the floor bricks. (This can he any kind of sand, or even loose topsoil. The form will be covered with your mud mix, then removed to form the oven’s interior.) The form should be a few inches higher than half the oven floor’s width. [For example: An oven 27 inches wide (one-half of which equals 13½ inches) should stand 16 to 20 inches high.]Hold a level across the top; measure the distance to the floor to calculate the interior height of your oven. Multiply it by 63 percent (0.63) to determine the proper height for your oven door. Write this number down!
Mixing Mud for Your Outdoor Oven
Good oven building soil usually is found below the topsoil. It contains clay which, like cement, holds things together. Use it straight out of the ground or mix it with sand. If you have nowhere to dig, look for construction sites, road cuts or river banks. Clay subsoil should feel sticky, slippery and a bit greasy (in contrast, silt and organic matter feel floury and crumbly). Wet, you should be able to roll it into snakelike ropes and bend it easily. The mix is usually one part clay subsoil and anywhere from one to three parts sharp sand (also known as builders or masonry sand); pure clay subsoil also works, but tends to shrink and crack more. Make a test brick or two by mixing sand and soil. Dried, the bricks should be dense and hard with few or no cracks.A tarp makes mixing mud easier on your back (6-by-8 foot minimum; bigger is easier). To mix, two people should hold opposite corners of the tarp and roll, but not lift, the mix from side to side. You also can stomp the mud while wearing boots or better yet, mix it with your bare hands and feet. If you muck around in the mixture, be sure it is free of sharp debris.
Add water a little at a time, then jump in and do the twist, breaking up the clay and mashing the sand into it. Dance until it starts to clump like dough for piecrust.
Pack a hard ball (50 to 100 pats), and drop it from chest height. It should hold together. If it doesn’t, add a little water. If it’s too wet, add dry mix. Or you can continue and just allow more drying time, whichever is easier to do.
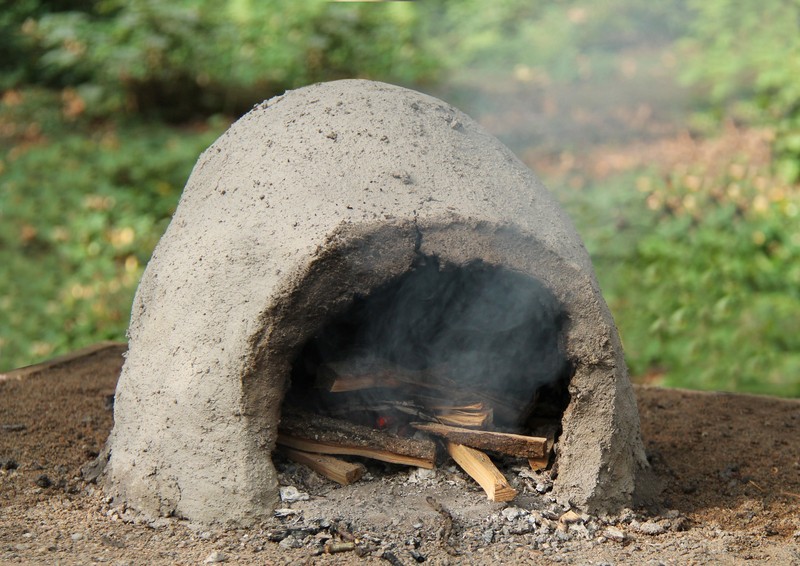
The above is not the end of it by any means. Please go to Mother Earth News or further information on building your wonderful outside wood-fire oven! Check out the illustration and see if your oven appears close to what the author expects.
In no time at all you will be a master chef and will be able to proudly, in a matter of days, show friends and family what you built with your own two hands in the backyard!
Sounds like this is going to be fun