Leather working is one of those skills that is a lost art, but would be desperately needed in a survival crisis.
This simple project gives you insight on how to work with leather as well as simple metal working.
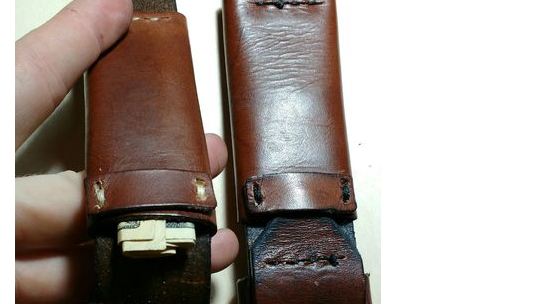
Buckle Frame
Take some of your steel bar and grip it in a vice.
Hammer it into the rectangle/square/circle/etc. shape you desire.
Cut off excess and hammer closed.
Buckle Needle
Cut and flatten some excess steel bar. Grip the end with a vice, leaving some slack, and hammer so that the end begins to curve forward.
Do this until it is almost shut, then stick the square buckle frame in there, and finally close the gap.
As a final step, bend 1/2 or 3/4 of the needle upwards, so that the belt can lie more flat upon the stomach when looped through the buckle.
Cut Out Buckle Hole
Cut out a hole about 1″ tall and as wide as the thickness of your buckle needle.
The hole should be about 3-4″ from the end.
Attach Buckle
Loop the buckle needle into the buckle hole, and then sandwich it.
Punch some holes and stitch it shut so that the buckle is completely attached to the belt.
Attach Belt Loop
Cut out a thin strap of leather, about as long as necessary too completely hug your belt, and as wide as necessary according to your preference.
Use a knife to thin out the ends to 1/2 the thickness.
Use some epoxy to stick the ends against the back of the belt, thus hugging it, underneath that excess flap.
Punch out holes and stitch underneath where the loop is, thus completely enclosing the loop into the belt.
Begin Making the Secret Compartment
Grab your thin sheet of leather, and let it hug the belt. Gently hammer the edges so that the sheet bends into shape.
Remove the sheet from the belt and begin stitching it shut. In order to protect the other side from being pierced as you hammer holes into the front, place something inside underneath the fork as you pierce your holes (I used an old ruler).
When you stitch, emerge from underneath, pull out the string, and as you enter again I found it easiest to pull it through with some needlenose pliers. Repeat the process until finished.
Once finished, tie it off in the inside.
Trim Flap & Finish Secret Compartment
Trim that excess flap so that it is thinner, such that it extends over the compartment by 1/2″-1″, and so that can slide underneath a tab, to close the compartment.
Bevel, wax, burnish, and darken the edges of the flap.
Cut out a small rectangle, which will act as the tab which the flap will slide underneath to close the compartment.
Finally, slide the compartment onto the belt in its designated place, and pierce holes through the entire belt where the compartment ends. Stitch through those holes so that the compartment is thus stuck in place.
Cut Belt Holes
Now is time for the final steps, which includes trimming the end of your belt to your desired shape, and cutting out holes so that you can wear and adjust your belt.
A great way to determine where to cut out your holes is to measure your favorite belt. Measure the distance from the start of the leather to the hole which you always use.
If you work with leather, this project is child's play, but if you are new to the art, it is a good starter project that will let you get your feet wet without destroying a lot of leather or wasting a lot of time.
To learn more about leather working, check out Instructables.
Featured Image via Instructables