For a food to make a good long-term survival food, it must have a long shelf life and be fairly nutritious. Flavor is low on the priority list. That doesn't mean it's impossible, though. Learn how to make delicious chocolate chia survival bars with the recipe below.
Ingredients:
2 1/2 cups powdered dry milk
2 cups oats (quick or regular will work, but I like regular)
1/2 cup chia seeds (need chia seeds? check out my picks below to order some)
1/4 cup cocoa powder
3/4 cup sugar
1/2 teaspoon salt (optional)
2 Tablespoons Protein Powder (optional)
1 package plain, unflavored gelatin
3 Tablespoons honey
1/2 cup water
Step 1:
Pour all the dry ingredients in. The order does not really matter.
Step 2: Stir dry ingredients
Mix well to get the chia seeds and other ingredients evenly distributed.
Step 3: Combine gelatin, honey and water
Step 4: Stir over medium heat until it boils
Stirring as you heat it, let the mixture come to a rolling boil. This is when the mixture keeps boiling even when stirred. Do not overheat.
Step 5: Add liquid to dry ingredients and mix
This dough is thicker than most. A good mixer will have no problem. Mixing by hand will require patience. You will need to check the consistency of the dough. It should mash into a ball in your hand, not crumble. Add water, 1 tablespoon at a time, until your dough forms a ball.
Use a spatula or spoon to scrape the dough from the sides. This helps it mix more evenly.
Step 6: Check consistency
Take a handle of dough. Press it in your hand. If it crumbles, you will need water.
Step 6: Add water if needed
Add water 1 tablespoon at a time until the dough will form in your hand. If it still crumbles, you need water. Do not add too much. Add one tablespoon, mix, check. Add more as needed. You may not need to add any, but in dry climates, this is often necessary.
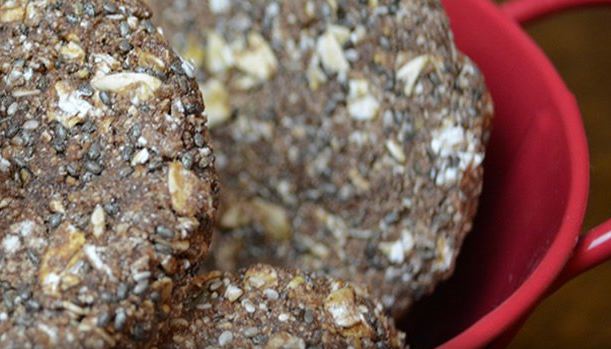
Step 7: Measure portions, pack and form
I used a 1/4 cup scoop to measure my bars. ( I am measuring the 1/4 cup before packing the dough in the cup) Then, I packed the mix in, turned it over on a wooden cutting board, and flattened the bars, rounding the edges with my hand. You will need a nonstick surface for this. A wooden cutting board is recommended.
Step 7: Repeat Step 6 until finished
This recipe makes approximately 16 bars when you use a 1/4 cup measure.
Step 8: Bake or dehydrate your bars
Baking Instructions:
Heat your oven to 200 degrees. Place the bars on a cookie sheet and bake for 2 hours. Cool before storing
Dehydrating Instructions:
Place your bars on a dehydrator rack, spacing them so that they do not touch. Dehydrate for 3 hours. Cool before storing.
Step 9: Store bars, or serve.
I served mine…We had to try them. I still have a few left, but more were eaten than not. A good sign. Would love to know what you think when you try them!
With this recipe, the bars are essentially dried so that they last a long time. If you wanted to, you could forgo the dehydrating and simply bake the bars for a nutritious snack that will last a few days.
To keep them on the shelf for a few years, though, we recommend that you dehydrate or freeze them. They will provide an excellent energy boost in rough times and make a great dessert that'll improve the dull survival meals your family will have to endure when SHTF.
We loved this excellent recipe and if you did too and you want to see more how-tos like this, go to DIY Ready.
I just ate a pouch of tuna I had in my bug out bag . Put salt and pepper and mayo in it . Had all that in the bag as well . Along with a granola bar . Very good lol