Want to learn how to make your own sturdy and reliable takedown bucksaw for when SHTF? Everything you need to learn is below and afterward, you'll have a durable bucksaw for when you're bugging out. Check out the quick how-to:
You'll Need:
1 Bacho 51-21 Bow Saw Blade, 21-Inch, Dry Wood
60 inches of 2×2 lumber
10 inches of 1×2 lumber
2 – 10 d nails
50 inches of 550 paracord
Saw
Drill and bits
Hammer or maul
Wood chisel
Vice
Pencil
Measuring device
2 – 15 inch 2×2’s (verticals)
1 – 20 inch 2×2 (cross beam)
1 – 8 inch 1×2 (tension paddle)
Directions:
Make a center mark on the two vertical pieces.
Cut tenons on both ends of the cross beam. Mark a line about 1/2 inch on all four sides of each end of the cross member. Secure in a vice and cut the lines about 1/4 inch deep on all four sides on each end to create a shoulder tenon. Once cut, chisel the cut pieces away from the ends of the stock.
Cut a 1/2 to 3/4 inch slot on the bottom ends of each vertical piece. These slots will receive the bow saw blade.
Drill a hole that will snuggly fit the 10d nails in each of the two slotted ends.
Align the tenon on each vertical at your halfway mark and pencil in the shape for the mortise.
Drill a hole inside the outline to match the depth of the tenon. Chisel out the remaining wood from the mortise joint to the proper depth. Dry fit the cross beam to the verticals.
With the cross beam inserted into the verticals, install the saw blade in the two slotted ends of the verticals. Remove the blade and place it on top of the slotted verticals. With your pencil, outline the holes and bore the appropriate size hole that matches the nail you will use as a pin for the saw blade.
Reassemble the saw and insert pin nails.
Drill two holes about one inch in from the end of the 1×2 paddle. Use a drill bit that will allow enough room for the paracord to pass through. Lace one end of the paracord through the two holes in a weaving fashion. Loop the paracord around the top ends of the two verticals. Pull tight and secure the cordage with a knot.
Wind the paddle in a circular motion to tighten the cordage. Once you are satisfied with the tension on the saw blade, allow the paddle to toggle on the cross beam.
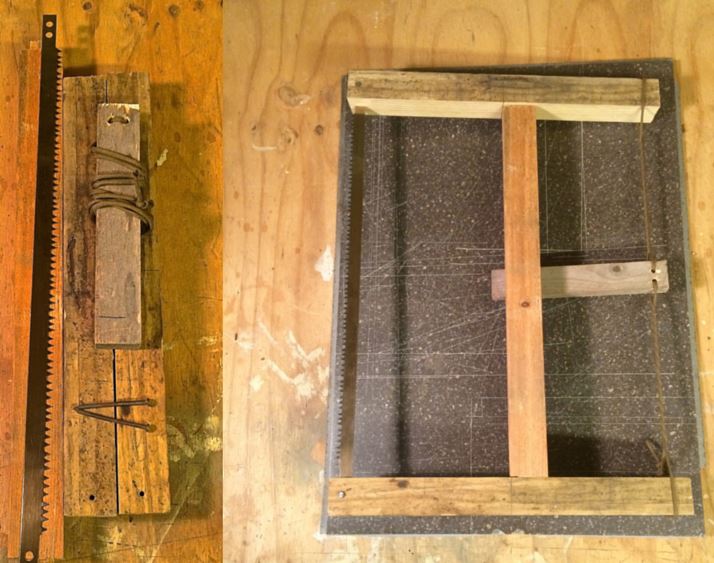
As far as DIY projects go, this one is a fairly easy build. Essentially, all you're doing is constructing a frame to hold the saw blade. What makes this build special is that the entire structure folds down into a very pack-friendly size while also adding very little weight to your gear.
If you'd like to learn more about this build and get some more tips and tricks, check out the original article at Survival Sherpa.
Also, you can take one of those “manual chainsaws” with the wrist straps and make a “Bow saw” with a piece of green wood.
Built mine already , I made all the fixings myself . 14 inch deep and 21 inch long saw blade