Making sure your everyday house or survival shelter is weather proof and insulated is a major method of saving money in heating costs and eliminating drafts.
For that task, there are very few things on the market that can beat expanding foam.
Stop Drafts—and Mice!
Plugging holes on the exterior of your house with foam is a great way to stop air infiltration, but it may not keep out pests. Mice can and will chew right through regular expanding foam, but there are formulas that stop insects and rodents. So the next time you plug exterior holes, choose foam labeled to resist pests.
Dampen for Fast Curing
Expanding polyurethane foam requires moisture to expand and cure. If you're applying foam to dry wood or other dry surfaces, or working on a day with little humidity, misting the area first will help the foam expand and cure faster. Be careful, though; you want to dampen the area, not wet it. Foam won't stick well to a wet surface. You can also mist the foam after it's applied to maximize expansion and speed up the curing process.
Firm Up a Wobbly Showerhead
Squirt a little expanding foam around a loose shower arm, and it'll be solid as a rock. Let the foam set up until it's stiff and carve off any excess around the shower arm. Slide the cover plate tight to the wall and you'll never know there's foam holding things together. This same trick firms up any other loose or wobbly pipe.
Cut Cured Foam With a Bread Knife
A serrated knife with a flexible blade is perfect for cutting off excess foam. Just make sure the foam is completely cured and firm all the way through or it'll stick to the blade.
Seal Foam With Foam
Basement or crawl space rim joists are a major source of energy loss in a house, so it's well worth the effort to add insulation and seal any cracks and gaps. A good DIY approach is to cut rigid foam insulation to fit between the joists. Cut it about 1/2 in. undersized so it's easy to fit in. Shim the rigid foam in place with little chunks of foam. Then fill the space around it with expanding foam. Don't forget to caulk or foam the joint between the sill plate and the foundation too.
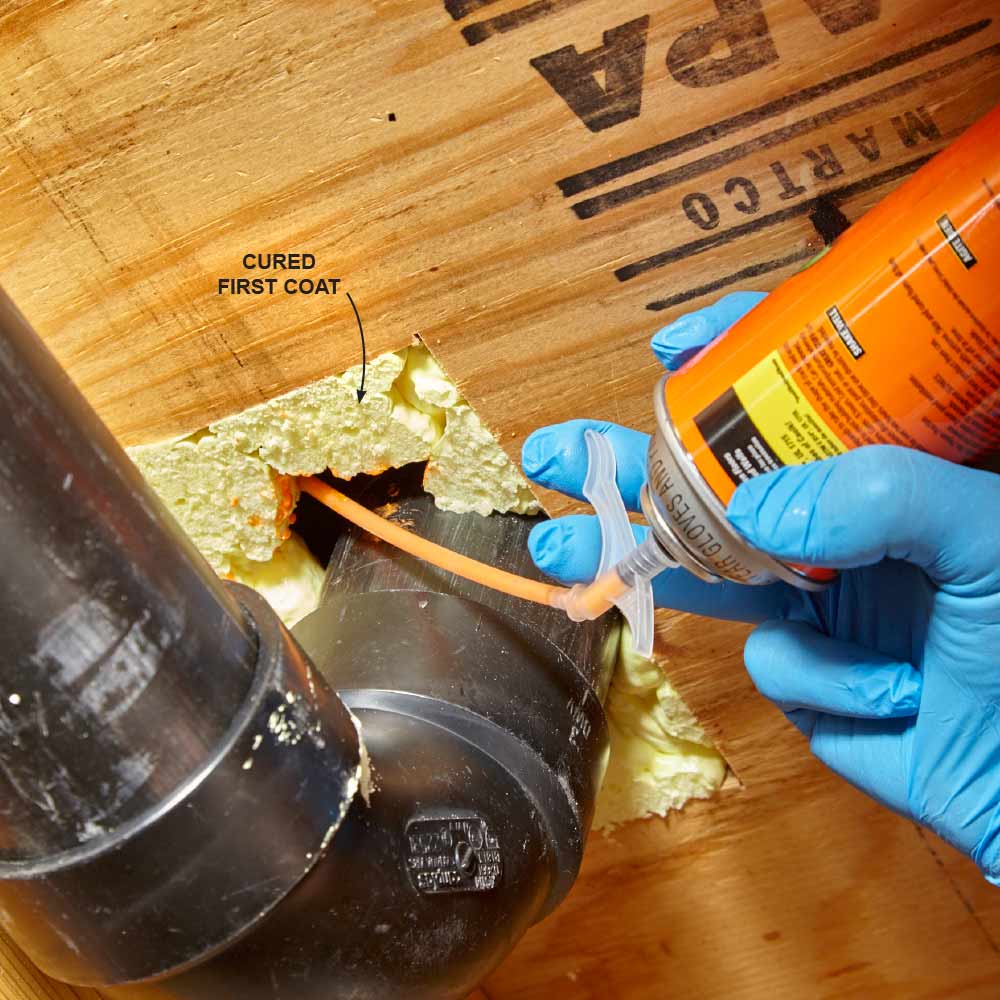
Big Holes Need a Double Dose
Some holes are so big that the foam starts to sag. For large holes like this, the trick is to fill the perimeter, let the foam cure and carve it off. Then add another layer to finish the job.
Play It Safe Around Windows and Doors
Sealing around windows and doors is one of the most common uses for expanding foam. But it can actually push the jamb inward, making them impossible to open.
Avoid this by using minimal expanding foam. It's formulated to fill the space around windows and doors without excess expansion. Look for cans labeled for use on windows and doors. Another good idea is to fill the space with two layers.
Push the applicator tip all the way to the back of the space and move it quickly along as you pull the trigger. Let this first layer expand and cure. Then add another if necessary.
For most of us, expanding foam is a handy tool we use to seal up gaps or cracks in a building to secure something, eliminate drafts or weather proofing a room.
As a survival tool, its role is the same, but that is vital if you are trying to ensure your home or shelter can withstand the test of time.
To see other useful tips on using expanding foam, please visit Family Handyman.
Featured Image via Family Handyman