There really is no secret to keeping your tools in good condition.
The largest investment you will have to make is time and effort; here is one person's remembrance of their grandfather and what he did to keep his tools in good condition.
Grandpa bought quality to start with
Grandpa didn’t buy the cheapest tool on the rack. He knew that a quality tool was an investment not an expense. So grandpa looked at the tool he was purchasing, checked the keen edge, the weight and strength of the steel, and the quality of the handle before he made a purchase. Money wasn’t as plentiful in grandpa’s day and he wanted to make sure this tool purchase wouldn’t be necessary again.
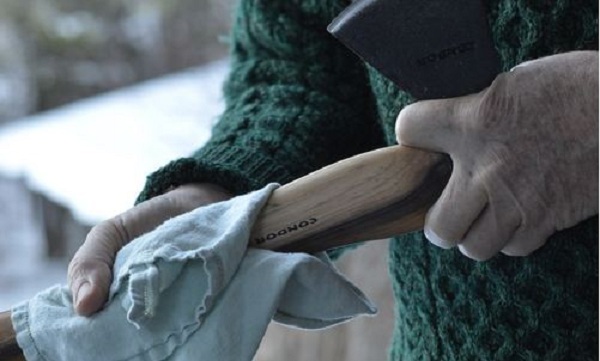
nce he got that tool home, Grandpa did a few simple tasks to ensure that those tools maintained their sharp blades and smooth handles for a long time.Grandpa preserved the tool’s handle
Most tools have ash or maple handles. They are strong but generally unfinished. In fact, the unfinished handle is a mark of a quality wooden handle. Some manufacturers put a varnish on the handle to disguise inferior wood stock.
Grandpa took a fine grit sand paper or a fine sanding block and brushed that handle in the direction of the grain to remove any splinters that may have roughed up the handle in transit. A smooth handle is easier on the hands.
Then grandpa took a cotton rag and a container of boiled linseed oil and rubbed that handle from top to bottom letting the linseed oil soak in for 30 minutes, before rubbing off the excess. Boiled linseed oil dries quickly on the wood and forms a thin polymer film that allows the wood to breathe while preventing the wood from drying out and cracking. It also preserves the wood from moisture damage and rot.
Grandpa knew that rags soaked in linseed oil needed to be dried on the line before being put away. Boiled linseed oil soaked rags can heat up and spontaneously combust if they aren’t dried thoroughly. Remember that time the neighbor’s garage burnt down? That memory reminded grandpa to always dry his rags, after use.
Grandpa kept his tools sharp and rust free
Tools left out in the elements tend to dull and rust. Grandpa countered the tendency to dull by sharpening the blades of axes, hoes, chisels, and knives before using and before putting them away for a season. Many tools don’t come from the store ready for action. Many tools, like garden hoes, must be sharpened even before the first use.
To sharpen a tool you must begin by deciding how much of a sharpening it requires. If a tool has a chip in the blade surface or if the blade has ground down, begin with a file. A farmer’s file has two grits of fineness, a coarse side and a medium side. For blades that are severely damaged that need an over haul, begin with the coarsest grit on the farmer’s file. Use the file at a slight angle to the blade edge, keeping the general shape of the edge in mind as you file.
Tools are sharpened from coarsest grit to finer grit, with each level of sharpening getting a little finer. In the second level of sharpening any marks left on the tool from the previous level of sharpening are erased by the new sharpening tool. The tools in order from coarsest to finest:
• Farmer’s File (2 grit sizes)
• Sharpening Puck (2 grit sizes)
• Leather Strop with honing compound (finest grit and polish)At each level the next finest grit is used to remove the marks of the sharpening tool before it. By the time you get to the leather strop, the blade will be highly polished, with a keen edge that will last through a day of work.
When you are sharpening a smaller blade or a blade that still has a good edge, you can just use the leather strop to improve the cutting edge. There’s no need to start at the file every time. The file is for jobs where the edge is damaged or terribly dull.When sharpening always preserve the angle of the edge. Don’t try to drastically change an edge or you may end up creating a dangerous tool that’s no long able to do the job it was meant to do.
How Grandpa fixed a rusty tool head
If a tool is left out in the weather and becomes rusty, a solution of 1 tablespoon of salt and just enough vinegar to make a thick paste, can be rubbed on the metal in a circular motion, to remove the iron oxide. This should be repeated until all the rust has been removed. Then the tool should be rinsed in clean water. Sharpening of the blade can be done while the tool is damp, but the metal should be thoroughly dried before it is put away.
Grandpa rubbed metal tools with oil at the end of the season
To keep the metal rust free in a cold, damp garage, grandpa rubbed the tool heads with an oily cloth. Mineral oil or machine oils can be used for this task or a beeswax compound. The oil coated the metal and protected it from humidity.
Cold weather can cause water vapour to condense on the surface of metal tools, by oiling the metal surfaces are protected from rust and discolouring in storage.
Grandpa stored tools in their place
Grandpa stored his tools in a shed or garage, by hanging them up off the floor, or placing them in a box reserved for tool storage.
By hanging the tools up off the floor, tools are prevented from knocking against each other, or being damaged by other tools. The tools were organized and easy to find. Rodents were kept away from gnawing at the handles or soiling the blades. The tools would be preserved for the next season of use.
The thing to remember with tool maintenance is that while there are a few hacks that can make it easier, diligence, time and effort are the key requirements.
As with any piece of equipment, if you neglect to maintain it, it will eventually give out, but if you do maintain it, you will get years of service out of it.
To learn more on tool maintenance, check out Joybilee Farm.
Featured Image via Joybilee Farm
Good advice.
Matthew McGrath
A trick i learned through silversmithing. Dampen a cloth with lighter fluid and then rub it into a tin of old-fashioned solid floor wax. Apply to any steel tools and allow to dry. Buff away any excess with a dry cloth to leave a durable film that prevents corrosion. Also works great on sterling silver to prevent dark patina on jewelry.
Scott Crabb KNine Kustoms
Grandpa would have loved Fluid Film. Awesome stuff for wiping down and storing metal.
he let grandma rub his tool
First, BUY QUALITY TOOLS. Boiled linseed oil for wood handles, light lubricant oil or turpentine for forged metal. Your hand tools will be working long after you’re gone in your great great grand children’s hands.
Don’t let the kids touch them!
Lewis P Belinsky
Of course, he used his.
I too do this, and I’m only 51
Best way to make your tools last for long is to make sure nobody else but you use it 🙂
You sir could not be more correct
Reynaldo R Fanugao
All the crap tools from China are not worth the effort. Just buy new.
Lonn Peterson
Very true. Best to start off with a quality tool. I still remember my grandfather having a large barrel with sand and oil mixed in. When finished with his shovel, he would put it in this barrel. The shovel kept a good edge and never rusted.