Anything you do in the outdoors that requires stealth is obviously benefited by a decent camouflage set-up; I even camouflage some of my fishing gear for when I am fishing for very suspicious book trout.
Here are the basics.
The need for camouflage in my mind applies mainly to 3 scenarios:
• Recreational hunting. I’m trying to fill my tag, and I don’t want the game to see me.
• Survival hunting. The sustenance of my family requires that I kill something to eat.
• I wish to stay hidden from those that may be hunting me in the event of WROL.It is plain that two of these scenarios are critical, make-or-break, do-or-die endeavors.
With that thought in mind the DIY camo project starts with finding (flat only!) paint colors that match your natural environment. Generally speaking, deserts are light to dark browns and grays. Don’t forget blue painter’s tape while you’re buying paint, and you might pick up a 1″ foam paint brush or two while you’re there.
So you’ve got your weapon and you’ve got your pallet of spray paints all put together. Next, collect things like pine boughs, es, grasses etc. from your natural environment (or the environment to where you’ll be bugging out). These can be augmented with items like frayed cord or rope, chicken wire folded over six or eight times (it has to be folded over itself to create a noticeable pattern as you paint-and chicken wire is one of my faves), randomly cut sponges and paint brushes, and other items.
Start with your degreaser of choice. Fully wipe the weapon or other item down to remove dust, debris and any oil that could prevent the paint from adhering to the item. Wipe the degreaser away with a dry, clean cloth or rag. Double check to make sure you got it all.
Next, put a foam earplug in the in the barrel, tape off the loading port, the ejection port, the front and rear sight and any other of the weapon’s features that might be caused to malfunction if they get paint on them. Also, if you’re painting a weapon with a red dot sight, or a scope on it you’ll want to either tape up the features of the item that would be adversely affected by the application of paint, or remove the item and plan to paint it separately. Painting a scope for instance separately means that you’ll have to re-zero the weapon, and it also means that you may end up with a scope that doesn’t quite blend in with the weapon that it is mounted on.
For those reasons I usually leave the “glass” in place and take good care to tape up the lenses and knobs appropriately.
The first step of paint application is to thoroughly cover the weapon in the base color. I like the results I get from starting with the lightest color first, usually tan or light green. Often it’ll take a couple of coats to get sufficient coverage. As spray paint dries fairly quickly, a second coat doesn’t take too long. Be sure to apply the paint with smooth, even strokes. Avoid the temptation to go back and forth as you’re spraying as this will cause drips. Follow the spray can’s instructions as to how far away to hold the can when you’re spraying, and then adjust as necessary. Once the weapon is well covered and sufficiently dry, its time to apply the pattern(s) you’ll be using.
Take a pattern item (pine bough, clump of field grasses, or, my favorite-the folded over chicken wire) in one hand and the paint can in the other. Hold the pattern item against the weapon and spray a short burst at the pattern item. Move about the weapon, changing the spacing and the angle-of-orientation randomly. Avoid the temptation to “overdo” this first pattern application, as you’ll be filling in the gaps with subsequent colors. As you change to the next darkest color, feel free to change your pattern item if you wish. Fill in the spaces that you didn’t cover with the first pattern-color, and don’t be afraid to partially overlap the first layer of pattern in places to enhance the effect. It may be helpful with some pattern items to apply a coat or two of any color to the pattern item and let it dry before you start using it. The extra layers of paint will make its features thicker and will help the pattern to be more visually effective.
I do the black very last and somewhat sparingly to avoid drowning out the rest of the pattern-colors. Don’t forget the trigger guard, the barrel from all angles and the back end of the buttstock.
If you choose, spray a color of your choice on a paint brush and dab at the places where the tape was to avoid “shiny, black spots”. Again, be careful to not diminish the functionality of the weapon. Then double check again to be sure you have all the tape and whatnot removed. A blocked barrel could be disastrous. A taped over ejection port could be anything from an embarrassing nuisance at the range to a failure to feed in a life or death situation.
Do-It-Yourself camouflage via rattle-can paint is pretty easy to do and pretty hard to screw up. Its not very time consuming, and it is fairly inexpensive. It provides a protective layer of paint to your weapons and other gear, and helps you move past the “it looks so nice, I’m afraid to scratch it phase” of ownership.
What you will need to rattle-can camo your gear:
1. Two to four shades (or more) of flat paint that are similar in color and shade to the area you operate in.
2. Foam earplugs for the barrel
3. Blue painters tape for sights and other components that may not function properly if painted upon
4. Eye protection, dust masks, latex gloves and some clean rags or cloths
5. Leaves, pine boughs, grasses, frayed rope, or chicken wire (did I mention that’s my favorite) or whatever else you think might make good patterns
6. Degreaser/cleaner like alcohol, mineral spirits, paint thinner to give the paint a proper surface to adhere to
7. 1″ foam paint brush(es)
8. A well ventilated area to paint in
9. About 30 to 60 minutes of free time
You make sure you “camo-up” your clothing, why not your survival or hunting gear?
If you need to hide or remain undetected, it could be your make-or-break difference; for a relatively small investment, you can make sure you are well hidden with no give-away points and that can make the difference between getting found or not, eating or not.
For more tips on camouflaging your gear, check out Ask a Prepper.
Featured Image via Ask a Prepper
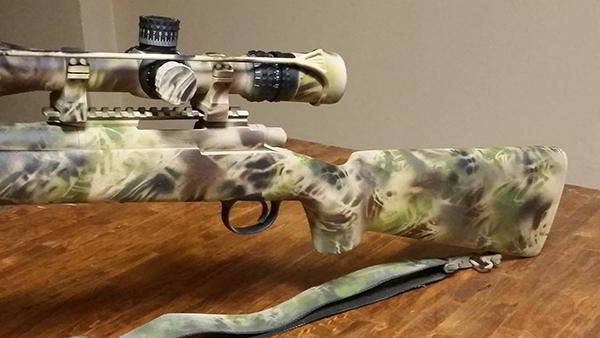
Done, stripped, done again, stripped, done again lol been doing it for a while.
Rattle can paint job.
Mackenzie Jones
ARs??
yeppp, tucks gun too maybe my tac 12
Zachary Milhoan
Helllll ya
God post, DHS
Alexander Trojano