Besides being functional the moccasins described below are also fashionable! Hey, if you are going for a rugged shoe it might as well be nice looking too!
Moccasin soles need to be strong and thick but the uppers and tongue are better made from the thinner areas. When marking out a pattern it’s good to arrange the different pieces with all of this in mind. Also, some hides are generally thicker than others. The difference in thickness between a winter hide and a summer hide is notable but there is also a thickness variation between male and female and even different deer species.
I based the bare bones of my design around the ‘pucker toe’ moccasin worn by the woodland tribes of North America. There are other, simpler designs that I had made before such as the side fold ‘mitten’ moccasin but I liked the way the puckering lifted up any stitching to the top of the foot, well away from ground level where it might leak or wear more quickly. I had also decided to use a liquid rubber mixed with shredded sticky rubber granules to paint a hard wearing, grippy sole onto the moccasins and I quite liked the idea of being able to extend this waterproof surface up the sides slightly and seal the stitching on the heel tab. Although in theory, buckskin costs nothing in monetary terms, it is priceless to the person who has just made it so not wanting to end up with a ruined buckskin, my initial attempt was to be made using calico stitched together with wool and a darning needle. Using this method, I could get the fit just right with the added advantage of being able to take the prototype moccasin apart and use it as a working pattern. After playing around with the puckering method and adding uppers and a sewn in ‘bellows’ tongue I felt confident enough to mark out my first moccasin on a nice, thick fallow buckskin and cut out the five pieces that would form it’s basic structure.
It probably comes as no surprise to learn that there are also many methods of stitching buckskin. For rough and ready garments, an oversized running stitch or whip stitch using buckskin thonging is quick and effective. The fibres in buckskin ‘knit’ together quite nicely when joined in this way, with no need for hems. As the material is so thick, each stitch hole must first be made using a sharp awl. This isn’t as time consuming as it sounds once you get in a rhythm. The buckskin thonging even becomes it’s own needle by twisting one end into a point with licked fingers. Being a show off I decided to keep my stitching small and neat for maximum weatherproofing opting for sinew as a thread and a modern size 18 saddlers needle rather than a traditional bone or antler version. Highly weatherproof skin garments that were traditionally sewn using sinew are truly amazing. Sinew, again being a natural product, has it’s limitations. Although incredibly strong for it’s size, sinew only comes in short lengths so must be joined or twisted into thin cordage. Luckily there is a modern alternative in the form of synthetic sinew which comes on a huge roll. Hurrah!
My attempts at neat puckering weren’t quite as good as planned. It’s a difficult technique to master as you can see from the images, especially with thick buckskin. Each stich on the tongue vamp (B) corresponds with a wider spaced partner on the front foot section (A). As the stitching is pulled tight, the foot section ’puckers’ up to make the toe box. At this stage the moccasins were beginning to take shape but also looking worringly like a pair of granny slippers! The vamp, now stitched in place extends to form the tongue and soft, thin ‘wings’ (D) were sewn onto the sides of this for joining to the upper (C) later, forming a ‘bellows’ tongue. It’s worth pointing out here that due to the thickness of the fallow hide, I had soaked the buckskin to make it easier to crimp and sew the puckering. Even with pre-made awl holes, the needle proved difficult to push through two thicknesses of hide so a pair of blunt pincers proved invaluable.
While the foot section was still damp I pushed my foot inside to get a good fit before marking the correct position of the heel tab and stitching it together. Buckskin will stretch when damp so make your moccasins slightly small while the individual pieces are still dry. Once the moccasins are completely stitched soak them in water for a short while, plunge your feet within, lace them up and wear them until they dry again. In theory, they will stretch and mould to your exact foot shape!
With the heel tab stitched in position the upper was then joined to the foot section with an overlapping seam and running stitch. Lastly, the tongue wings were stitched to the upper incorporating looped tabs for threading the parachute cord laces through. Both moccasins were soaked, stretched and worn until dry as previously mentioned. Magic feet here we come!
After a couple of experiments with ‘shoe goo’ and rubber flakes painted onto buckskin scraps, I felt confident enough to begin waving the paintbrush around threateningly near my precious new footwear. To help the rubber goo adhere to the buckskin surface I ‘roughed’ up the soles with coarse sandpaper and slapped the mixture on while it was still malleable and tacky. The goo starts to solidify quickly so the rubber flakes were patted into the pungent coating as soon as it was in position immediately giving a matt, textured finish.
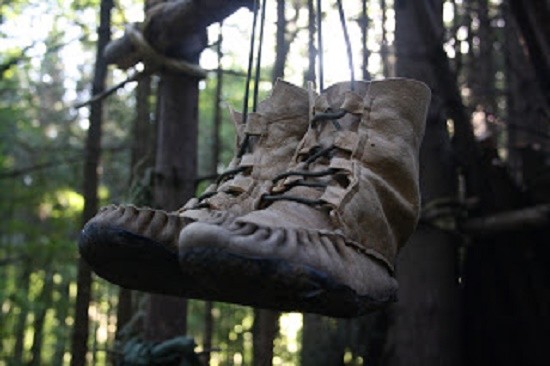
Having worn my woodland moccasin/boot hybrids several times in the last twelve months I must say that they certainly bring you closer to nature. The detail of the woodland floor can be felt with every step! The small easy to manage size makes them perfect as back up footwear or for silently padding around camp.
We agree that it is a good idea to get started now. Take those measurements, get the supplies, and really work on the craft of moccasin making! Remember, it’s not just you but the family, friends and close neighbors that will need this skill when the SHTF!
Why not be the person they turn to when foot protection is needed. Shoe making also makes for a great bartering tool. Need some extra flour or want to raid your neighbor’s veggie garden? Offer them a pair of great moccasins!
For more on how to make a durable pair of moccasins while you're bugging out, visit Wilderness Survival Skills.
virus !
Combat boots work to and last years
Logan Wishart
Well I’m glad i still got a pair of my RFI boots.
I’ll say this I have made a number of pairs of shoes and boots for the re enactment I do and they have held up well my battle boots are five years old and I have replaced the sole once . If you want them really water proof dip into boiling wax then brush in all I say is patience is a virtue for making shoes
Old red wing loggers. Mink oiled up and virtually indestructible even under heavy use. I’ve been wearing my current pair for 4 years now, logging, hiking, snow, rain etc….
I would love to make a pair that fit my foot perfect