Keeping your dishes clean in a survival or campaign scenario is a chore, but it is also very important for your health and safety.
This amazing dish rack is fairly easy to build and collapse when you do not need it and best of all makes washing dishes much easier than having your wash and rinse pots on the ground; you will need:
• 10 5′ Scout Staves
• 14 6′ x 1/4″ lashing ropes
• 1 20′ x 1/4″ lashing rope
• 2 narrow pioneering stakes
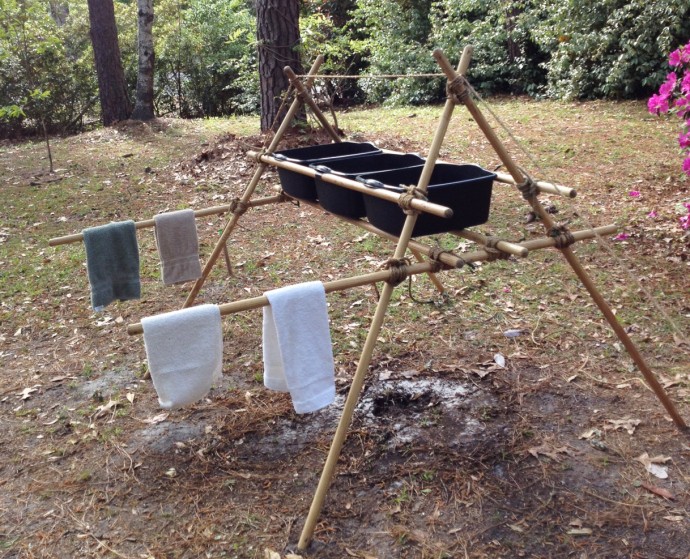
• 3 wash basinsMake the A-frames. Because the rack will be holding around nine gallons of water, approximately 72 pounds, the lashings for this project need to be especially tight. An easy way to assure you’ll have well-lashed A-frames is to first Square Lash the tops at 90º and then the ledger to one leg, also at 90º. This will create strain on the lashings when the other leg and end of the ledger are lashed together, yielding a nice tight A-frame. With the wash basins, lash the ledger in place about 28″ from the top of the legs. Since all we’re using are Scout Staves, in this design one side of the ledger will purposely extend out much farther than the other on each A-frame—a place to hang some towels.
Connect and stand up the A-frames. Lash two staves to the outside of the legs of each A-frame, about 20″ from the top. The edges of the wash basins will rest on these staves. Hammer in two stakes about 12′ apart where you want the rack to be located, and position the connected A-frames between. Halve the 20′ lashing rope and approximating the midpoint between the A-frames, secure the rope to the top of one leg with a Clove Hitch, and pulling the rope to the other A-frame, repeat the process on the top of a leg on the other side. Tie the ends of the rope to the stakes on either side, securing the ends tightly with Taut-Line Hitches.
Add the two-stave basin supports. The A-frame ledgers will now serve to do something more than keep the A-frames’ legs from shifting. They’ll now support the two remaining staves that assure the basins stay put! Lash these staves parallel to one another on top of the ledgers, on either side of the rack.
Place the basins on the rack. Once you check to see all the lashings are tight, and the central rope is secure and stabilizing the structure, then you’re ready to bring on the basins. Position them side by side and fill them about 3/4 of the way up.
Making your own dish washing rack and station saves time and effort doing what no one really every enjoys doing – washing dishes after a meal.
This model (there are others) is easy to assemble, requires few materials and is durable enough to use throughout your campaign adventure or survival situation.
To see this and other projects like it, please visit Scout Pioneering.