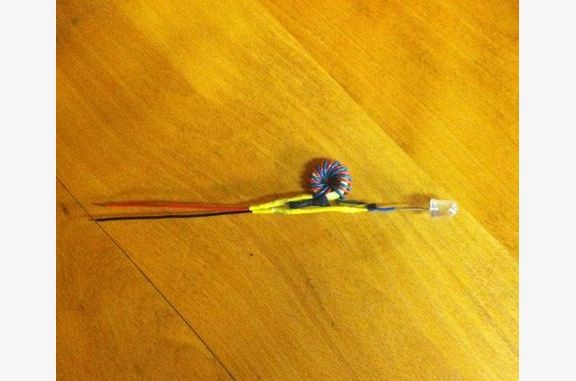
Salvaged parts are only as good as the knowledge of the people who find them. That's definitely the case in this tutorial, which will inform you how you can craft a useful flashlight from only the spare or discarded electronic pieces you have lying around or can buy cheaply from a second-hand store.
A joule thief is a self-oscillating voltage booster that is small, low-cost, and easy to build. It can use nearly all of the energy in a single-cell battery, way far below the voltage where other circuits consider the battery fully discharged (or “dead”). It was named a “Joule Thief” because the circuit is stealing energy or “joules” from the source.
The circuit uses the self-oscillating properties of the blocking oscillator, to form an unregulated voltage boost converter. The output voltage is increased at the expense of higher current draw on the input.
The materials needed are: 2n3904(or equivalent) transistor, 10k resistor, toroid bead, an LED, and some spare wire(the gauge depends on the size of the toroid bead, I used 22 gauge). You may need a breadboard as well if you don't already have one, but that's only if you want to pre-build the circuit before you solder it.
You can salvage the toroid bead, transistor, wire, and the resistor, from an old PC power supply, that's where I got my parts from.
For tools, all you need is a soldering iron, some solder, wire cutters/strippers, and a lighter for the heat shrink!
So first things first, gather the toroid you want to use. I'm going to use some 22 gauge wire, I ended up using a larger toroid for ease of winding, but when I want to put this circuit in an enclosure, I use a smaller toroid.
I always use extra wire; I would rather have more than less, so collect about a foot long wire in two different colors, and twist the ends. Then put the wire through the hole of the toroid, and begin winding until you can't wind any more, or hit around 10 winds. Once we have completed the coil, I get one wire from each side, and solder them together, it makes it easier to keep track of once you start creating the circuit. Once that's complete, you have your toroid coil complete, and we can move on to the next step of creating the circuit and putting this coil to use.
I would recommend first bread-boarding the circuit to ensure that it works before soldering it all together.
Get your transistor, LED, and resistor together, and place them in the breadboard, then place the toroid coil built in the step before, put the jumper wire from the collector pin on the transistor to the ground. Add power and you got light! Simple as that!
For the power source, you could use a AA, AAA, C, D, or any other battery, no matter how full or “empty”.
Take the transistor and solder the LED and resistor as shown in picture one, the positive lead of the led should be on the collector of the transistor and the negative lead to emitter, the resistor hooks from one of the single leads on the toroid to the base of the transistor. The other single lead from the toroid coil goes to the positive/collector pin. Then solder a wire to the emitter/negative led connection to hook up to the negative side of the battery when you want to power it; that is your ground wire. The two wires you soldered into one will be hooked up to your positive.
So you should end up with a jumble of soldered together parts and wires, so it's time to heat shrink it together to make it look better.
While this tutorial is very technical, it does an excellent job of illustrating just how useful knowledge of reusing scrap supplies can be when it comes to making further use out of old supplies.
A little knowledge can go a long way in a long-term survival situation, and can make you a more effective survivor and leader to your survival team. Not only that but the ability to craft tools like this from what most would consider garbage is a tradable commodity that could lead to additional food, ammo, water or batteries. To see the tutorial in its entirety, visit Instructables.

Great idea
Great idea