The DIY remote controlled security camera gives you the ability to monitor your property and possessions as well as anyone who might be approaching either.
That gives you a vital head start if you are in a SHTF situation.
Knowing what is going on around you is critical to keeping yourself, your family and your possessions safe and sound!
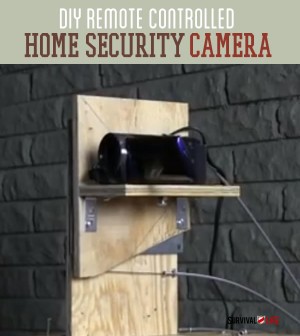
This cool setup uses a basic video camera, one you can pick up inexpensively. Then, you just need wood and bike cables to make a pulley system that allows you top operate this amazing camera system from afar.
How to Build A Remote Control Video Camera:
Tools Needed:
Phillips screwdriver and cordless drill with Phillips tip if available
Pliers
Braided steel cable cutters, small pair
Flat tip screwdriver
Saw to cut wood
Drill
1/16” drill bit
Parts Needed:
2@ 6”x6” lazy susans
4 @ 1-1/2”x1-1/2” angle brackets
1 box of #10 x1/2” pan head screws
1 pack of #10 x3/4” pan head screws
1 pack of #10 x 1-1/4” pan head screws
1 pack #10 flat washers
1@ 1/4-20 x 1” hex bolt for camera tiedown
16 @ #214 x 13/16 small screw eyes
8 @ #212 x 15/16 medium screw eyes
4 @ bicycle brake cable housings cut to the same length of 20’ (Can be up to 50’ pieces)
4 @ pieces of 1/16” braided steel cable cut to the same length of 22’ (Can be up to 52’ pieces)
8@ cable stop clamps (usually found at auto parts stores also called drum clamps and carburetor cable stops)
Small video camera with output cables for connection to TV or video monitor
Video extension cables and connectors roughly as long as the length you chose for your control cables
TV or video monitorBuild the Control Base with Pan Function
Step 1:
Mount 1 Lazy Susan to the bottom side of the pan base board using the pre drilled holes and 4 #10×1/2 inch screws.Step 2:
Flip the pan base board over and attach 2 of the 1-1/2”x1-1/2” angle brackets using the pre drilled holes and 4 #10×1/2inch screws. These will support the upright tilt function support board.Step 3:
Attach upright tilt function support board using the pre drilled holes and 4 #10×1/2inch screws.Step 4:
Attach the bottom portion of the Lazy Susan to the main motion control base board using the pre drilled holes and 4 #10×1/2 inch screws.Building the Control Base | Tilt Functions
Step 1:
Mount 1 Lazy Susan to the back side of the vertical tilt control board using the pre drilled holes and 3 #10×1/2 inch screws.Step 2:
Take the camera base board and attach 2 of the 1-1/2”x1-1/2” angle brackets using the pre drilled holes and 4 #10×1/2inch screws. These will support the camera base board to the vertical tilt control board.Step 3:
Flip the vertical tilt control board over and attach the camera base board using the pre drilled holes and 4 #10×1/2inch screws.Step 4:
Attach bottom side of Lazy Susan to the upright tilt function support board using the pre drilled holes and 4 #10×1/2 inch screws.
You have worked hard to prepare for the SHTF moment.
Why, after all you have done, would you leave it vulnerable to intruders?
With this amazing DIY remote control security camera system you can quickly and relatively inexpensively give yourself the coverage you need to ensure your loved ones and possessions are safe.
To learn how to finish the project and to see detailed designs of the layout, please visit Survival Life.