If you've been having problems with your WiFi signal, you've probably been spending quite a bit of time trying to figure out how to solve this issue. Luckily, it's a problem that can be solved with just a bit of tinkering. Find out how below.
Got no dough for a commercial WiFi antenna? Looking for an inexpensive way to increase the range of your wireless network? A tin can waveguide antenna, or Cantenna, may be just the ticket.
Building your Cantenna is easy, just follow these steps.
Collect the parts
Drill or punch holes in your can to mount the probe
Assemble the probe and mount in can
Collect the parts:
You'll need:
A N-Female chassis mount connector.
Four small nuts and bolts
A bit of thick wire
A can
The Connector
A N type Female Chassis-mount connector. One side is N-female for connecting the cable from your wireless equipment, and the other side has a small brass stub for soldering on wire. These can be found at electronics stores.
Nuts & Bolts
You'll need them just long enough to go through the connector and the can. I've used #6×1/4″ stainless. If your N-connector is a screw on type, then you won't need the nuts and bolts.
Wire
You'll need about 1.25″ of 12 guage copper wire. This wire will stick into the brass stub in the N-connector.
A Can
This is the fun part. You're looking for a can between about 3″ and 3 2/3″ in diameter. The size doesn't have to be exact.
Drill or punch holes in your can to mount the probe.
The N-connector assembly will mount in the side of your can. You need to put holes in the right place to mount the connector.
802.11b and 802.11g WiFi networking equipment operates at a range of frequencies from 2.412 GHz to 2.462 GHz. Ideally, with your can size, the TE11 cut-off frequency should be lower than 2.412 and the TM01 cut-off should be higher than 2.462. It would be good, also, if your can is longer than the 3/4 Guide Wavelength. If your can is a little off in length or diameter, don't despair, experimentation is fun!
Assemble the probe and mount in can
Now you'll need that bit of wire. You'll need a soldering iron or a friend with one as well. Cut the wire so that when it is stuck in the connector as shown, the total length of both the brass tube and wire sticking out past the connector is 1.21″.
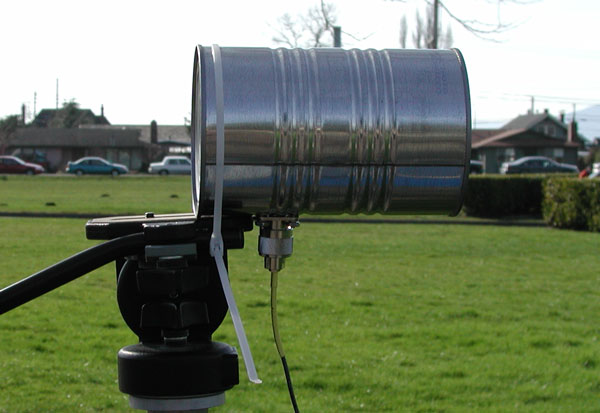
When you've got your wire correctly sized, solder it into the connector keeping it as straight and upright as you can. When it's cooled, bolt or screw the assembly into your can. Put the heads of the bolts inside the can and the nuts on the outside to minimize the obstructions in your antenna.
Connect your antenna to your wireless card or access point
You'll want to have a wireless NIC or access point with an external antenna connector.
While this may seem like a highly technical build, it is actually a fairly simple project that can be accomplished with relatively limited time. All you need is a can, some nuts and bolts, and some wire. While spending the extra bucks on a factory-made WiFi antenna may seem like the easier option, practicing these small builds is a great way to build a skill base for an uncertain future.
For more on this great project, check out the original article at Turnpoint.
Featured Image via Turnpoint
Mark Lgbo White
Jason Beduhn
Richard Steerich Wakon Bloxom
Jennie Shaffer
This is the dumbest site
Leon Grubaugh
Hope my nephew is paying attention
“Stupid is as stupid does.” – Forrest Gump
.
How about a video!
Joselyn Padilla
Ryan Baker
Yea yea. I forgot
Hey Peter Wells
Norbert Konrad Borowski check this out bro
Patrick Swift
I’ve seen this before
Jess’e Rene’e Reynolds
Is that a close-up or is that a gigantic can?
Nicholas Canterbury
Sick of these click bait BS links
Kenny Barnett u might need to make that lol
Byron Garcia
So you gonna get wifi now or nah?
https://www.youtube.com/watch?v=LaAf6Ltgal8
E Vil Rumor
Justin Routt, a project for you today while you lay around lol
Can’t move very well. Doctor said I need a backiotomy.
Lol yeah I am sure that it is FCC approved