MRE's are a quick and reliable way to make sure you can feed your family without having the mess and time commitment of preparing and cooking a full-blown meal.
They are particularly handy if you are facing a survival situation where the power is out or if your water supply has been compromised.
Food Savers are your friend
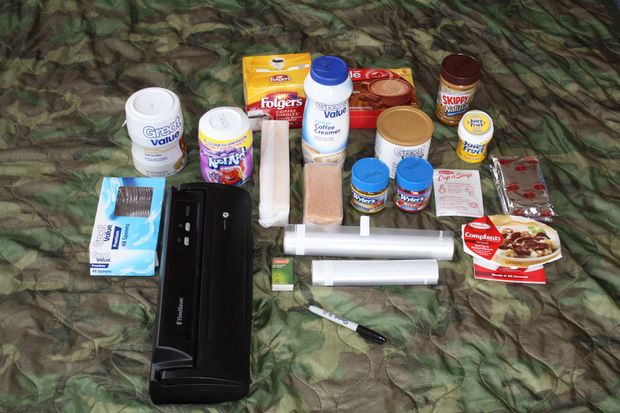
The Food Saver Vaccum sealer is one of my best survival preps. It has paid for itself a hundred times over. For the DIY MRE you need the Food Saver, the 8 inch roll bags and the 11 inch roll bags.
Making the pouches
First make all the smaller pouches you will need with the 8 inch roll bag. You will need to make 4-5 of these smaller pouches depending on what you choose to add to your DIY MRE.
I used 5 bags for this DIY MRE. The first bag was cut approx. 3 1/2 inches long, sealed along the bottom edge and then further divided into 4 compartments.
The next bag was also cut 3 1/2 inches long, seealed along the bottom, and divided into 3 compartments.
The next 2 bags were cut approx. 6 inches long, sealed along the bottom, and then a small compartment of approx 2 inches was seealed along one edge.
The bag was cut approx. 4 1/2 inches long, sealed along the bottom, and divided into 3 compartments.
Adding the “extras”
Place 2 beef buillon cubes, 2 chicken buillon cubes, 1tsp of salt and 1 tsp of pepper into the bag you made with 4 compartments and seal it up.In one of the 6 inch bags with 2 compartments carefully spoon peanut butter into the smaller compartment.
In one of the 3 compartment bags you made place a package of cocoa mix, 3 tsp of sugar, and a coffee single into the comaprtments and seal it up.
In the other 3 compartment bag I placed 2 tbls of coffee creamer, 2 tbls of Kool-Aid, and 2 tbls of iced tea mix and then, you guessed it, sealed it all up!
In the other 6 inch 2 compartment bag I placed 4 peices of chewing gum (Juicy Fruit), TP, and a box of water-proof matches and then sealed it up.
The BIG bagCut an 11 inch roll bag approx. 10 inches long and seal the bottom. Place the Pop-tart, main meal, the little pouches, and a spoon into the big bag in such a way as you minimize “dead space” and protect the more fragile items (crackers mainly) and seal it all up.
The End
Each of the DIY MRE's I have made have some sort of breakfast item (Pop-Tart, instant oatmeal, cereal bar, etc) a package of instant soup, and a main meal.
Depending on what is in the different DIY MRE's you get between 1200-2000 calories in each package (based on the nutritional info on the various packages).
Once sealed they are a good bit smaller, package wise, then standard MRE's so they take up less space and for about the same weight.
If you are a Mom with kids, chances are very good you have made MRE's for most of your child's life – you just have not called it that.
By utilizing prepared and sealed foods you probably already use, you can create an emergency supply of MRE's that is both nutritious and filling as well as will give everyone in your family the calories they need to keep energy levels up.
Plus, you will save a lot of money while not sacrificing that much in terms of shelf-life.
To see more ideas for making your own MRE's, check out Instructables.
Featured Image via Instructables
Tyler Nelson Lonnie Garrett Seth Nelson
Kody Leedy Joe Leedy Billy Leedy Joe Leedy II
Teri Swanson
nice article. Linked to it on my private blog. Maybe someday I’ll make it public 🙂
Jill Pelletier