The days of dragging buckets of water or your hose out everyday to water your plants is now at an end. Coming into the modern age and we will show you how!
Materials
Clear hoses are cool and useful to see if the system is working properly. However, sunlight + water + nutrients = algae. The algae hasn't been troublesome, yet, but I thought you should be warned. If you use clear hoses like I did, you might want to cover them with an opaque material.The horizontal hose is 1/4″ ID (inner diameter). The wick hoses are 3/8″ ID. If I were you, I would make all the hoses the same size as the wick hoses to simplify the connections. In my instructions, I will call for 3/8″ hoses even though the pics show 1/4″ hoses.
MATERIALS FOR EACH PLANTER:
10-quart wastebasket/bucket (Umbra Garbino works great)
Lid or mulch to cover the dirt on top
2″ length of 1″ diameter PVC (often available in lengths greater than 2″ at a discount)
12″ length of 1-1/4″ diameter PVC pipe
End cap for the 1-1/4″ diameter PVC pipe
10″ wick that can fit inside a 3/8″ ID hose (I used tiki torch wicks)
6″ length of 3/8″ ID hose
(1) quick-connect male connector to connect the hose to the planter. THE WICK MUST BE ABLE TO FIT INSIDE (a barb-style connector will be a lot more difficult to use).
(1) quick-connect “Tee” connector to connect to the wick hose to the main horizontal line (unless this is the last planter on the end–then this should be an equivalent quick-connect elbow)
Small tomato plant (between 3″ and 8″ tall)
Good soil/compost mix (add some limestone to prevent blossom-end rot)
Some foam, gravel, or other material to raise the soil off the bottom of the planterMATERIALS FOR THE RESERVOIR:
4′ length of 4″ diameter PVC pipe
(2) 4″ diameter PVC female adapters
(2) 4″ diameter PVC male plugs
Quick-connect stop valve that connects to 3/8″ ID hose
Some trustworthy pipe hangers and chains or cable. The reservoir will be heavy and unmanageable when full.
A large cork (possibly from a large bottle of good tequila)OPTIONAL RESERVOIR WATER LEVEL METER:
Elbow connector, barbed for 3/8″ ID on one end and threaded on the other
8-10″ length of 3/8″ ID hose
Tiny piece of cork (smaller than 3/8″ but large enough to see)OTHER MATERIALS AND TOOLS:
Enough 3/8″ ID hose to reach from the reservoir to the furthest planter. Then get a few more feet so you can make mistakes. (hose is pretty cheap)
A few square inches of screen mesh to keep out mosquitoes
A rotary cutting tool to cut PVC and the wastebaskets/buckets
A fat soldering iron if you prefer to melt holes in plastic. I do. (ventilated area, blah blah blah)
Hot glue or sealant
PVC cement
Teflon ribbon for fixing hose connections and leaks
A ladder, step stool or long armsMake the Planters
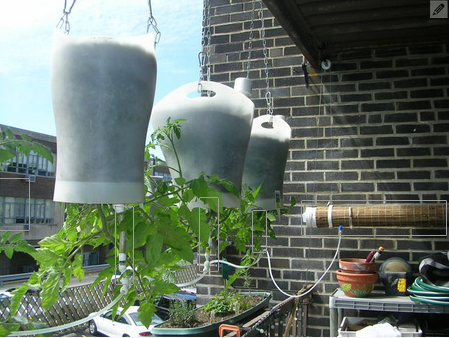
The basics of the planter is a bucket with two holes in the bottom. One hole for the plant. One hole for the wick. When you cut the holes, cut them smaller than you think they should be. If you don't get it perfect, it's much easier to widen the hole. I used a rotary tool to cut the bigger hole and a soldering iron to make the smaller hole.Do the following for each wastebasket/bucket (hereafter referred to as “the planter”):
- Look at the bottom of the planter.
- Cut a hole for the plant 1″ in diameter in the center of the bottom of the planter. (fig. 3a)
- Cut a hole for the wick 3/8″ in diameter near the first hole in the bottom of the planter. (fig. 3a)
- Based on other guides I've seen on the internet, I chose to raise the plant above the level of the hole. I suppose you could skip it. If you don't want to raise the plant from the hole like I did, skip this step. Glue a 2″ length of 1″ diameter PVC pipe to the inside of the plant hole so the entire length of PVC is on the inside of the bucket. Use lots of glue so it's sturdy and seal it well. (fig. 3b)
- Screw the threaded end of the 3/8″ ID quick-connect male connector into the wick hole from the outside of the planter so the quick-connect end is on the outside. (fig. 3c)
- Seal this connection with hot glue or some kind of sealant.
- Get half of the wick into the 6″ length of 3/8″ ID hose (fig. 3d) and connect it to the outside of the planter, threading the other half of the wick into the planter through the wick hole. (fig. 3e)
- Your planter should now have a bare wick sticking up 5″ inside and a hose with the other half of the wick, sticking out of the bottom.
- Attach the quick-connect tee connector to the end of the hose, so the connector looks like an upside-down letter “T.” For the last planter, substitute the tee connector with the quick-connect elbow.
- Now to make the aeration tubes so the roots can breathe… (you can skip these steps if you like, but I think this helps the plants)
- Put a bunch of 1/4″ diameter holes in the 12″ length of 1-1/4″ diameter PVC pipe. I used my soldering iron.
- Put a 1/2″ diameter hole in the end cap
- Cover this hole with a small piece of mesh. Glue it in place on the inside of the end cap. This will help keep away the mosquitoes if the planter has standing water inside. Set this aside until you are ready to insert the plant..
High five yourself – you're 3/4 done! Now head over to Intructables to see how you hang these plants and build the reservoir!
There are so many different approaches when it comes to getting a good garden on its way but it is always nice to try something new; and a definite time saver.
This is not your grandparents vegetable garden! Certainly, take the tips and tricks you’ve learned from them but modernizing what you’ve been taught into a new and improved garden can never be frowned upon.
And remember, once you’ve done all the hard work, the following season will be a breeze!