This DIY outdoor oven is perfect for cooking in the summer. It's also incredibly ideal for off-grid living. Follow these simple steps to make your own cob oven at home! You'll love the results!
In the blistering heat of summer, the last place you or anyone else wants to be is in the kitchen cooking.
But who says all of your warm-weather cooking has to be done indoors? Or for that matter, who says that anyof your summertime cooking needs to be done in your kitchen? Outdoor cooking is in fact a very legitimate and cost-effective means of food preparation in any circumstance, and the great news is that you don’t have to be limited in that area to simply grilling or barbecuing.
Outdoor ovens are beautiful because they can take you away from all that. Most frequently associated with the preparation of delicious breads and pizzas, but fully capable of producing as wide a variety of foods as any name-brand indoor unit, outdoor ovens are the perfect cooking remedy for excessive summertime heat.
A fully fired outdoor oven can get quite hot, which in addition to boosting its warm-ability factor also makes it uniquely functional as a high-quality cooking unit. And that is what really makes an outdoor oven special – it will prepare your foods so thoroughly, purely, and exquisitely that when you eagerly scarf them down it will seem as if you are consuming familiar dishes for the very first time.
Here’s a promise we can make: if you do indeed decide to construct your own outdoor oven using one of the many terrific DIY plans now widely available on the internet or in various books, the unit you build will deliver more bang for that proverbial buck than you’d ever dreamed was possible. The only caveat is that you must select the appropriate building materials if you expect to reap the full rewards of having your own outdoor oven…
Building An Outdoor Cob Oven: The Cliffs Notes Version
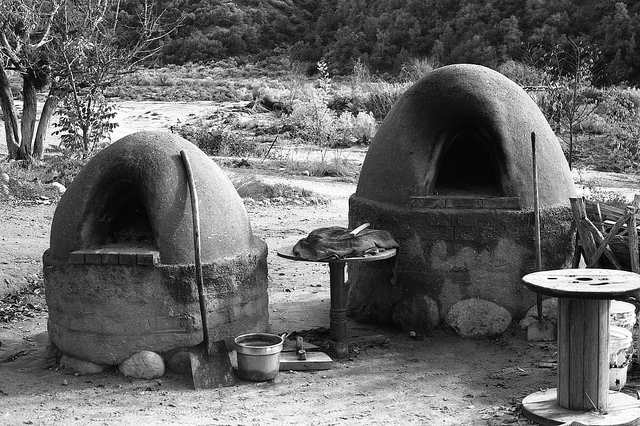
Should you decide to build your own outdoor cob oven, it will likely turn out to be one of the easiest do-it-yourself projects you have ever undertaken.
For those who don’t know, cob is an earth-based construction material made from a mix of soil high in clay content and a substance known as sharp sand, with the latter predominating at a ratio of approximately 3:1. Once you dig down below the topsoil you should have no trouble finding dirt that is rich in clay, and while coarse-grained sharp sand (also known as builder’s sand) might have to be purchased, it is a relatively inexpensive ($30-$35 per cubic yard) product.
The Most Versatile Backup Stove In The World Allows You To Cook Anything, Any Time, Any Where
If you do decide to build your own outdoor cob oven, here is a simplified step-by-step description of what you will need to do (and this of course is just one possible version; other design choices are possible):
Construct a foundation
Add an insulating layer of cob on top of the foundation (optional)
Build the actual oven department
Mark the outside of the cob dome for a doorway
Cut the door and remove the sandBuild a shelter to protect the oven
And that, in a nutshell, is it folks. By following just these few simple steps, none of which require the use of exotic, expensive, or difficult-to-find materials or tools, you will be able to construct your very own wood-burning outdoor oven, thereby giving yourself the ability to prepare dozens of delicious dishes for your family without having to worry about heating up your home or consuming precious electrical resources.
Principles Of Operation
An outdoor oven with a 24-to-27-inch interior diameter would be standard, and would leave enough room to cook a large pizza or multiple loaves of bread at the same time. With a normal-sized cob oven, just leaving the door open is usually sufficient to ensure that proper air exchange occurs and that all the smoke can escape during the firing stage, but with a larger unit, it may be necessary to add a small chimney to facilitate good air circulation and efficient burning.
Firing the oven is a simple affair – simply fill the cob compartment with dried kindling and wood and light it and let it burn for 2 to 3 hours, adding extra wood as necessary. Once temperatures reach the magic 650-750 degree range, you should sweep out the coals and any fire that remains and close the door for a few minutes so that the heat you have produced can be more equally distributed.
As the stove gradually cools, it will likely maintain temperatures in the cooking range for anywhere from 6 to12 hours, depending on cob wall thickness.
Cob Will Do The Job
An outdoor cob oven makes a wonderful addition to any homestead. The materials you use will be unlikely to cost you much more than maybe $25-$75 in total (excluding the cost of the roof/shelter), and the food you prepare will be so delicious that your family may beg you to cook dinner outside even in the middle of winter when wind chills drop well below zero.
We don’t necessarily recommend taking things that far, but there is no doubt that during these sizzling summer months an outdoor cob oven would be a real blessing that everyone in your home would come to enjoy and appreciate. And it would no doubt seem like a gift from heaven to those who were formerly spending 2 to 3 hours each day standing in front of a conventional stove in a hotbox kitchen frying, baking, roasting, broiling, and boiling a whole succession of piping hot dishes, all the while sweating like a marathon runner scurrying across the Death Valley at high noon on the hottest day of the year.
Doesn't this make you excited to cook in the summer again? When you build your own outdoor oven, you'll love how convenient it is and how much energy and electricity you'll be saving.
For more information on outdoor ovens, be sure to check out Off Grid News.
Featured Image via Flickr


These look very much what I remember seeing on Indian Reservations in New Mexico in the 1950’s.
It looks like a scene from Star Wars.
I seen almost the same thing in Mexico, they built 2 for a very big wedding I went to. They were 5 feet tall and about 10 feet across and sat on the ground, not raised to waist level. Took 5 hours to build and the fires started about 3pm – it was amazing how much food they were pulling out. (enough for 300 people) and it was Fantastic!!
Somewhere there may be some photos of those in NM. In the 1950’s. as a rule visitors were not allowed to take photos in certain areas. If one was even seen trying to use a camera in unauthorized areas, kids would grab them and pull out the film exposing the negative to the sun.
Navajo oven 2012. I remember seeing 2 or 3 of these grouped together. With many of them throughout.
Specs for a Pueblo oven.
Actually these oven bake delicious breads