Having an outdoor cooking alternative for if a survival incident occurs is critical to any well prepared survivalist.
Best of all, even if the “big event” never happens, you have a great way to cook outdoors with this simple to build and inexpensive all-in-one grill, smoker, stove and oven.
Concrete Foundation
A low-cost rubble trench foundation is recommended for most situations. The specifics will vary due to climate and soil conditions, but a rubble trench is usually 18 to 24 inches deep and filled with gravel, or gravel and stone. If you’re building the stove in a harsh climate with strong freeze-thaw cycles, add a French drain (a small valley filled with stones) to remove moisture. Raise the building site if necessary to avoid moisture problems.
For our rubble trench foundation, we used chunks of recycled broken concrete, also known as “urbancrete,” instead of stone. Concrete chunks from flatwork slabs, such as sidewalks and driveways, work best. They can be recycled and stacked like stone. Stack these up in layers to the top of the trench. Fill gaps with gravel and then tamp solid.
On top of the rubble trench, pour a 3 1/2-inch by 40-inch by 40-inch concrete pad.
Concrete-Block Base
The next step is to build a concrete-block base two courses high with ladder reinforcement (a wire mesh designed to add strength and prevent cracking) between each course. Use 4-inch by 8-inch by 16-inch blocks with a few half blocks as needed. Be sure to lay the block as perfectly plumb, straight and square as possible. Allow to dry for two days or so to gain strength.
Fill the base with gravel or a mixture of sand and gravel. Fill the base with two 6-inch layers, tamping each layer gently. Go easy on the tamping so as not to strain the concrete block joints. All you’re trying to do is settle the materials.
Complete the base by pouring a 4-inch layer of lightweight cement level with the top of the block base. This creates a strong, insulated layer under your firebox. Perlite is perfect for high-heat applications such as this. (According to the Perlite Institute, perlite is used to make gas fireplace logs.) Perlite mix for base: 1 1/3 bags cement, 13 pounds perlite and water. This cement-rich mix is strong enough to support the heavy load of firebricks and countertop, yet also insulate the firebox from the mass below. Let the concrete cure for four to five days.
Firebrick Hearth and Firebox
After about five days, the lightweight concrete should have cured sufficiently and you can begin building the firebox with firebrick. Place a half-inch layer of fine, clean sand on top of the lightweight cement. We screened our own sand (one two-gallon bucket) through fine mesh. Use a straight edge to make it as level as possible. Precise leveling is a critical step that determines the accuracy of the firebox.
The first layer of firebrick creates the hearth. Standard firebrick size is 2 1/2 inches by 4 1/2 inches by 9 inches. The front row of firebricks is perpendicular to the other firebricks and extends 2 inches beyond the concrete block. This makes it easy to sweep coals and ashes into a bucket. We added half-inch concrete board shims under the front edge for stability, where sand would fall away.
All firebricks are placed without mortar so they are free to expand and contract. The placement technique involves carefully sliding each firebrick straight down — one against the other — into place to avoid gaps. After the first course is set, use the end of your hammer handle to tap on any high spots until all firebricks are flush with each other.
Measure the front of the base and find the center, which should be about 20 inches from either side. Start the first layer of firebricks by placing two bricks on either side of the center of the base, making sure that the brick hang over the front about 2 inches. (The first layer of firebricks should be 8 1/2 inches from the back and 11 inches from the side of the base — if you follow the diagram instead of the photos.)
Continue stacking firebricks for the sides of the firebox. The firebox is easy to build and the bricks can be stacked in about one hour.
Steel Shelf
If you don’t have experience welding and cutting metal, you might want to have a machine shop make the metal pieces for you. Otherwise, you’ll need a welder and a cutting torch for this step.
At this point, you can put the steel shelf (lintel for chimney) in place. It measures 14 3/4 inches by 18 inches by 1 1/2 inches (the sides are 1 1/2 inches high) and is made of quarter-inch steel. The most important measurement is the inside width, which for our shelf was 14 1/4 inches. The steel parts are joined with six spot welds: three per side, on the bottom so they don’t interfere with placing the firebrick. With a cutting torch, cut a 6-inch diameter hole in the center for the stovepipe. With the steel shelf in place, flush with each side, set the remaining firebricks in place to form the chimney base.
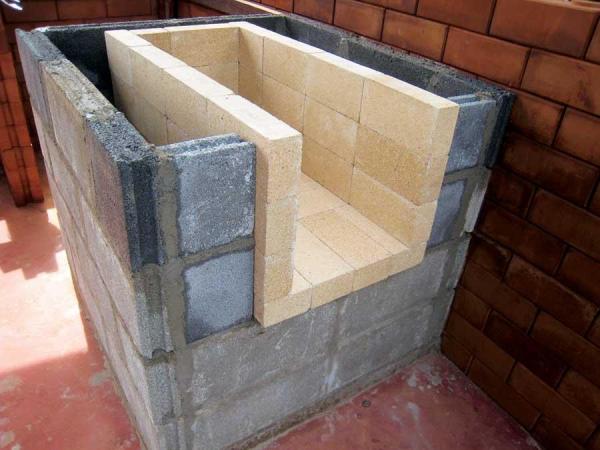
Concrete Block — Upper Half
To form the outside of the oven, set the remaining two courses of concrete blocks (with ladder reinforcement between courses), being careful not to bump the firebricks. Around the firebox opening (where the concrete blocks meet the firebricks), leave an eighth-inch space to allow for expansion and contraction. We stacked CEBs (compressed earth blocks) temporarily inside the firebox to keep them in place. Bricks would work just as well. Let the block dry for two to three days.
You’ll need a right angle grinder or wet saw to cut a few concrete blocks around the front of the firebox. Both tools will do the job, but my preference is a right angle grinder because of its low cost, ease of use and versatility.
Lightweight Cement
You can now fill the area between the firebox and concrete block with lightweight cement. We used a higher ratio of perlite for this to maximize insulation around the firebox (compressive strength is of less concern on this part). Perlite mix for upper half: two bags cement and slightly less than 26 pounds perlite. Allow to dry a few days before proceeding.
Concrete Countertop
The next step is to build the countertop. We chose poured-in-place concrete countertops for their strength, and resistance to heat and moisture damage.
We were looking for an inexpensive way to make concrete countertops and came up with a pretty good solution at a fraction of the cost of custom made countertops — about $20 instead of $2,000. (This cost is for 12 1/2 lineal feet of 25 1/2-inch countertops.)
We used 100 percent scrap materials for forming, about a half bag of cement, some quarter-inch rebar, and baling wire, sand, gravel and iron oxide pigment. Forms consisted of leftover eighth-inch cement board and scrap wood. We placed rebar in a grid pattern and then poured concrete on top. Create an eighth-inch space between chimney and countertop with a removable shim to allow for expansion and contraction. As the concrete set up, we used an edging tool to round the edges. Pigment was troweled on the surface as the concrete started to set up. It only takes a tiny amount of pigment sprinkled here and there to create a beautiful color. After the forms were stripped in three days and the edges touched up, we applied a “paint” of iron oxide mixed with water to the edges.
Oven Chimney
Building the chimney is straightforward. There is a damper within easy reach to control air flow and save firewood; open it up when starting fires, and close it down when baking so all the heat doesn’t shoot up the chimney. A cap on top of the stovepipe keeps out rain and snow, and a boot (or collar), along with some silicone, seals the connection on the roof. The stovepipe is in sections to facilitate removal and cleaning. The gap between the stovepipe and chimney base is filled with lightweight cement.
Tile Cladding
Tile is an excellent finish material that withstands a lot of abuse but also looks beautiful. You can tweak sizes of concrete block joints to get tile to fit perfectly and reduce the amount of tile cutting. You can also apply stucco to the concrete blocks or simply paint them.
To apply tile, first scrape the block wall clean of concrete residue. Use a drop cloth to protect the floor. Line up the tile to determine even spacing. Draw a level line around the stove as a guideline for the first row. (We started at the base on the front.) Mix a bucket of mortar, brush water on the back of each tile (or soak tile in water) and trowel on about three-eighths inch of mortar with a pointed trowel. Taper the edges, and lightly press each tile into place.
Check for alignment in each direction. A few light taps of your trowel handle will seat the tile firmly in place.
Allow the tile to set up a bit and then work grout into the joints with a rubber grout float. Do one section at a time, smoothing the joints and cleaning the surfaces in stages with a sponge. Squeeze out extra moisture from the sponge so the joints aren’t weakened by too much water getting into the grout. Remember to allow an eighth-inch gap between tile and firebricks for expansion and contraction.
Smoker Grate
All you need to turn your outdoor oven into a smoker is a grill grate (or typical oven grate) about (midheight) in the firebox. Simply drill four holes in the firebrick lining the firebox, insert steel pins in holes and add the shelf.
Oven Door
We built a 2-inch-thick insulated door of sixteenth-inch steel filled with perlite. The front piece of the door forms a lip that hangs over the firebox opening about half an inch to help reduce air leaks. The large wooden handle doesn’t get too hot to touch and enables the door to be installed and removed with one hand. There are no hinges; the door wedges into place. We added an adjustable vent to control airflow and spray painted the door with heat paint. Based on our experience, a 1 3/4-inch hole in the door seems to be the perfect size.
Making your own outdoor all-in-one grill, smoker, stove and oven is one vital step to ensuring you can cook wholesome meals if you lose power for fuel for any extended period of time.
Bet of all, not only is it easy to construct, it will not break the bank!
For other tips on building and using this amazing all-in-one cooking powerhouse, check out Mother Earth News.
C’mon man, that’s some crap you bought from Home Depot, this is how it’s done. I live outdoors and have made hundreds of fire pits, this is one was out of some brick I found laying around.
@[669612387:2048:R.a. Dotzenrod]
How about a video to go with that? I don’t know about anybody else but I learn better visually.
@[100003717619560:2048:Chad Tibbetts]
.
@[509399723:2048:Cameron Wike]
@[100000336707513:2048:Jason Baker]
Ed Heyward
Check this out Kelly Bittner
Becky Brown Richie
Video would have been nice
Dianna Elaine Saunders
Danny Rigel
Louis-christian Otis