In any survival situation, security and the ability to hunt food ranks as high as shelter, water and fire.
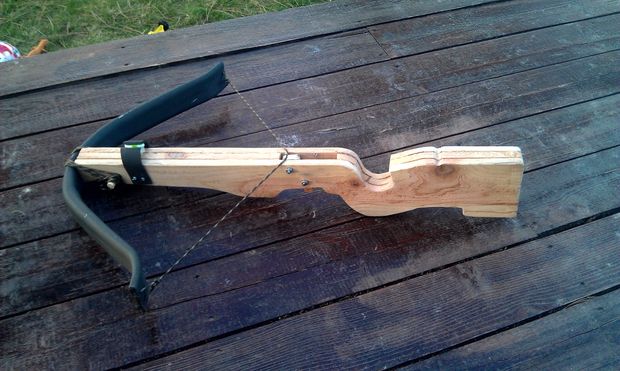
This versatile and easy to use crossbow, made of wood and PVC is relatively easy to make, easier to use and greatly improves your ability to secure your person, family and hunt food no matter what the situation you are facing.
Read below to get started on making this critical weapon!
Parts and Tools
Bow Stock
• 2 – 1/2″ x 6′ Fence Picket Board
• Wood Glue
Trigger and Safety Pin
• 2 washers
• 2 Small Springs
• Spare Wood
• Epoxy or super glueBow and String
• 32″ – 1 1/4″ PVC (16″ draw length)
• Paracord
• 2′ 2×4 w/ 1″ spacer blocks
• 22″ – 3/4″ pvc
• 5″ – 1″ pvcTools
• Wood Rasp
• Wood Chisel
• Mallet
• Sandpaper
• C-Clamps
• Heat Gun
• Rotary Tool
• Metal Cutting Wheel
Step 2: StockFor the stock, I used a design from Jwilliamson. You may have seen his instructable, Building a Custom Rifle Stock. Complements to him for the design. He provided 3 printouts that you can use as a template, and I'm including them here.
Print out the stock design and cut it out. Then trace it to a piece of stock board and cut it out. A band saw would be ideal; however I used a hack saw and a wood rasp since I don't have a band saw. Test out the stock taking note of how it feels and make adjustments as necessary. I put a slight positive angle on the grip for comfort. Once satisfied, use this cutout as a template to cut out two more stocks. On the middle stock you will need to cut out a large section from behind the trigger to after the string release mechanism.
After everything is cut out, take some time to line the stocks up with each other to ensure general accuracy (you can fine tune it after it's glued together). If you're satisfied with the results then glue them together with wood glue and binding/clamping them together for 24 hours. Once they're ready you can make any detailed adjustments with a wood rasp, sand paper, or a dremel.
Step 3: BowTo make the bow, I used a 1 1/4″ PVC pipe and cut it to 32″. Make three marks, one in the center (16″), and two marks an inch out from both sides of the center. To give your bow a subtle taper you can make a flattening jig with a two foot 2×4 and two pieces of 1″ blocks on the corners of one end. Heat up the pipe with a heat gun until it's pliable, then use the jig to flatten it to size, one side at a time. Flatten one end by squeezing the pipe between a flat 2×4 and your jig, having the 1″ blocks positioned between the center mark and the 15″ mark. Clamp the boards down and allow the pipe to cool before releasing the clamps. Do this to both sides. This will create the proper shape (notice both ends are flat, and the center has depth with one flat side).
Put a recurve to your bow by first marking three inches from the ends. Heat the ends with a heat gun and use a small pot as your guide to shape the recurve. Curve it up to the three inch mark you made.
The string notches I made have a 3/4″ gap between them. Mark the center of the bow's width and make two marks at 3/8″ from the center mark. Now cut out the notches with a saw. Once you have the notches cut you can give the bow its proper curve.
If you find yourself in a survival environment, anything that adds to your ability to hunt and protect yourself and your family adds immensely to your chances of making it out in one piece.
This versatile crossbow made of wood and PVC is one such tool that gives you an edge.
Easy to make, maintain and quiet to use but deadly accurate with a very strong punch, a few hours invested in constructing this is time well spent as it provides you with a critical tool in your security arsenal.
To see the rest of the instructions as well as tips on shooting this amazing crossbow, check out Instructables.
@[100000124222667:2048:Charles Neil Prestwood] @[1823320764:2048:Jace Hargrove] @[184104330:2048:Stephanie Holmes Watkins]