Tanning your own hides used to be synonymous with hunting but nowadays has fallen to the wayside as people are willing to spend a great deal of their hard-earned money to pay someone else for the service. To be truly self-sufficient, you must learn to carry out this skill yourself. The how-to guide below is a great tool to help you with that endeavor.
Salting Fresh Skins
When the skin feels cool to the touch, immediately cover the fleshy side completely with plain, uniodized salt.
Use three to five pounds for a sheep or deer skin.
The salt will draw moisture from the skin and liquid may pool in low spots. Just add more salt. Let the skin dry until it is crispy. This may take a few days to a couple of weeks. When completely dry, the skin is very stable.
Tanning Recipe
7 gallons water
2 pounds (16 cups) bran flakes
16 cups plain or pickling salt (not iodized)
2 large plastic trash cans (30 gallon) and one lid
4 foot wooden stirring stick
3½ cups battery acid (from auto parts store)
2 boxes baking soda
wood rack or stretcher
neat's-foot oil
nails
wire bristle brush
This recipe makes enough tanning solution to tan four large animal skins; or ten rabbit skins; or about six medium-sized pelts such as groundhog.
Mixing the Solution
Soak the dried skins in fresh water until flexible. Boil three gallons of water and pour over the bran flakes. Let this sit for an hour, then strain the bran flakes out, saving the brownish water solution. Next, bring the remaining four gallons of water to a boil. Put the salt in a plastic trash can. Pour the water over the salt and use the stirring stick to mix until the salt dissolves. Add the brown bran liquid. Stir.
When this solution is lukewarm, you are ready to add the battery acid.
At this point, you can peel off the hide's dried inner skin. If you have fresh skins, use as is. Add the skins to the solution and stir, pressing the skins down carefully under the liquid with the stirring stick until the skins are fully saturated. Leave them to soak for 40 minutes, stirring from time to time to make sure all parts of the hides are exposed to the solution.
Use the stirring stick to carefully move the skins to the other trash can filled with fresh lukewarm water. This is the rinsing process, which removes the excess salt from the skins. Stir and slosh the skins for about five minutes, changing the water when it looks dirty.
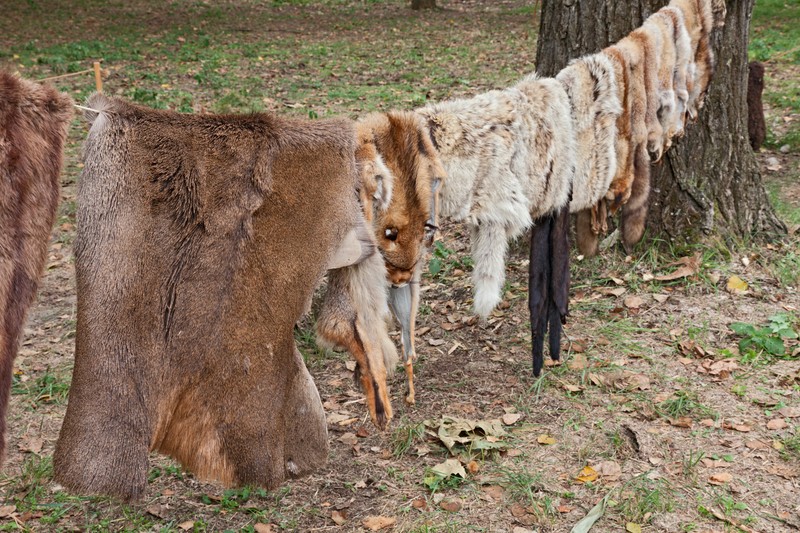
Remove the hides from rinse water. Let them hang over a board or the back of a chair or other firm surface to drain. Now, using a sponge, rag or paint brush, swab the still-damp skin side of the hide with an ounce of neat's-foot oil. It should be absorbed quickly, leaving only a slight oily residue. Tack the hide to your “stretcher.”
Check the hide every day. When the skin side feels dry to the touch in the center, but still flexible and somewhat soft, take it down from the rack. Lay the fur side down and go over the skin with a wire bristle brush.
There are a lot of different variations on tanning hide, and this is just one of the many. Done properly, though, and it will result in a durable skin which can be used in a variety of areas ranging from clothing to being displayed proudly on the wall.
One problem many people have with tanning hides is that they're frightened of ruining their hard-won prize. Don't be concerned! When the instructions are followed, this is one of the easier of your homesteading tasks. Try it out after your next hunt.
For more great advice on skin preparation and tanning hides, read more at Mother Earth News.
Interesting read I will have to try this method
Battery acid? No thanks. Have been tanning hides for years and prefer brains.
Johnny Walker
Josh Dillon
Is this method better than just salting and braining?
Different methods of tanning produce different qualities in the hide. Some of the different chemical compounds used are brain or egg tanning (emulsified oils) oil tanning, bark tanning which is a form of acid tanning, (tannins in the bark) acid tanning like the article describes, gluteraldehyde tanning, vegetable tanning and more. They all suit different end uses of the hide. No one method is universal.
A man couldn’t survive without this skill set a 100 years ago and a time might come again.
Salt will be important
When the time comes that I have to tan hides to survive. I’m sure these items are not going to be found. I would prefer a method more natural.
Tony Barnett
Brandon Jensen
Use oak chips. Plentiful here in the Pacific Northwest.
Steven Horter
Aaron Sawyers Derek Rupp this is similar to my tried and true method, but sounds easier.
Who is going to have that amount of salt both iodized and pickling salt I know absolutely nothing about tanning hides but if things go very wrong in this country this recipe seems unobtainable just as the battery acid at your auto parts store that was nuked lol .
Chelsea MB
Just brain tan them instead of wasting resources.
Am I the only one wondering where you could find 5 pounds of salt to do this? Post collapse that is. Can you just hang the hides?
Forgive my ignorance but what’s the reason to tan a hide? You can’t just clean em and dry em out? I’m new to the survivalist/self reliance gig. I’m learning g a lot but not clear on this.
If you dry the hide you have raw hide which is stiff and not usuable for much. Tanning, either fur on or fur off, makes the hide into supple, usable leather. Tanning is also used to preserve and water proof the hide.
Hope that helps.
Salt is just one method. Traditionally the hides were scraped (also called fleshing) and then placed on a stretcher. To keep them from shrinking too much as they dry. Then they were soaked in whatever method you are using to tan. With brain water or whatever liquid to rehydrate the hide. It was then rung out and worked by hand as it dried. This is called breaking the hide. This worked the tanning compound into the hide. Last step was to smoke the hide. This sets the tannins and helps waterproof the hide. It is now leather.
Hope that helps.
Go on youtube and look up videos for brain tanning. They have a bunch of good videos that show you some of the most natural ways to tan a hide.
tanning changes the protiens in the skin. I’ve forgotten exactly how but it makes it far more pliable ,though it must be worked, that is stretched time and again, to make it truly pliable. If raw hide or green hide gets wet it gets stiff and has to be reworked. Tanned hide doesn’t get stiff ,or as stiff , after drying and can be reworked much more easily. there is some water proofing effect from Tanning but not really a water proof as in water dosen’t get through, it does. to water proof you need a dehaired hide such as buckskin which is then treated with fat or something similar. Even this wil not be “water proof” as modern people think of it, more water resistant. BTW, the reason that buckskin Shirts etc had fringes was not decoration as such, but rather to give the water multiple runoff points so rain ran off the shirt faster You can issustrate this point by soaking one end of a towel and holding the edge parallel with the floor.Note how much water drips off, then hold towel so one corner is lower, you should note more water dripping off faster as it comes to the point of the towel.
You don’t need salt. Keep the brains of the animal. After removing every trace of meat,fat and membrane from the inner side of the hide stretch it out,even if this means lying it on the ground and pegiing it out tight, then LIGHTLY cook the brains, really just heating them as I understand it, mash them up into a thin paste then rub the brains into every part of the inner side of the hide. Every part. Keep rubbing till the hide has dried out mor or less and absorbed all the brain paste you’ve got. The brains of the animal are sufficient to tan that animals hide. After this build a small hut of branches or wheatever you have. Light a small SMOKY fire in the hut ,which serves only to contain the smoke somewhat, and hang the hide over the fire for a couple of hours, making sure the smoke can access all parts of the hide , no folds blocking the smoke. When it comes out you will need to work it some more to make it pliable. The Brain mix and smoke will alter the collagen in the hide to preserve it and render it more amenable to being rendered pliable.
There are different methods sure. First you must make rawhide by drying it out, removing flesh and membrane. Salt helps but isn’t a must but keep it away from flys. In a survival scenario brains are your best option just Google it.
Actually it does lol. Ty
Drew Szabo what we needed to do.
You lost me with battery acid, when the shtf, I doubt there would be much battery acid left in the stores.
Deandre Keelan
Thanks Quentin John Saville that seems like a little more off the grid solution . I have heard of using the brain but never heard the instructions thanks .
Bran flakes, pickling salt, battery acid, baking soda, and neats foot oil… In a post collapse situation?
How about oak tanning, brain tanning, and smoke tanning?
IDK, maybe in some places one can procure naturally occurring baking soda, pickling salt, neats foot oil, and battery acid. But, my guess is that in a post collapse situation, those may be difficult for most people to find….while animal brains (from the animal killed), smoke (from fires), and tannin (from oak trees) will be much easier to obtain.
^exactly.
William Ferguson
sorry but I do not believe using car battery acid is something I would ever use to tan a hide I will stick to using the brain at least that is safer and less toxic
yes i agree the brain is the best
Sick….do it the right way..lol..
My mom always used a branch to tan my hide, LOL
Craig Curlette
Terry Sliva
How do you dispose of this mixture once it is used?
Courtney Robertson
f**k. Yes. I love you.
Thomas Bagley