Buckskin is a beautiful, soft, and tough form of leather, and if you aren’t converting your deer hides into this amazing material, you’re simply wasting them. Still, it’s a difficult and time-consuming process to learn. Start your education by reading the instructions below.
In all leather or buckskin making the flesh and hypodermis membrane are removed. Hairs can be left on or removed depending on the final product. Commercial leathers also remove the hair but much of the epidermis and grain layer is left on.
To make buckskin the epidermis, grain level, much of the small fibers, hypodermis and flesh are all removed. Only the mature fibers are left to process.
Skin the animal carefully
De-flesh the hide with a scraper
Remove the hypodermis membrane by scraping
Remove loose hairs if required by hand
Remove the grain level and stubborn hairs by wet scraping
Remove small fibers by dry scraping
Stretch the (moistened) skin initially to start opening the fibers so as to make the skin more pliable
Dress the skin in a solution such as brains and water, or eggs and water
Continue to soften and stretch the skin so as to manipulate the fibers and coat them in the oils of the dressing. This helps to keep the fibers separate from each other as the skin dries
Apply more and more dressing with continual stretching and manipulating. About 3 or 4 dips in the dressing mixture.
When the skin has finally dried out (it needs to be continually stretched until it is dry) it needs to be smoked. Smoking changes the skin chemically to stop the fibers gluing back together when it gets wet, hence keeping the buckskin soft. Smoking also locks the oils from the dressing into the fibers.
Once the hide is stretched out fully it is then left to dry and it is then scraped of all the excess muscle, fat and the grain layer.
Getting down through the layers
If you do not remove the grain layer the oils from the brain or egg solution will not fully soak in and the buckskin will not become truly soft.
Tanning – eggs
We made up one pot of egg solution. For a fallow deer about 12 eggs are required per hide, well mixed with water in a ratio of about 4 parts water to 1 part egg.
With a hide where the hairs are kept on it is best to apply the solution with a sponge or cloth until it soaks in.
Applying the mixture
Tanning – brains
The first method starts with a vertical slit down the hide over the forehead. With the skull exposed a heavy knife could pierce the skull, allowing the brains to be scooped out.
The other method is to go through the area of the skull where the spinal column attaches to the skull. Again, a heavy knife is needed to hack away at the bone to open a hole big enough to get a small spoon into it.
Brain tanning – opening up the skull – front and back
To get all the brains out you need to mash the brains up with a spoon and scoop out as much as you can. Then add water to the brain casing and scoop or pour the last bits out.
Brains are mixed with water in the same ratio as the eggs. It is generally agreed that an animal’s own brains will tan its own hide but in terms of weight, for the average hide you need about half a pound of brains.
Preparing the brains solution
Warm water was added to the brains and mixed vigorously. It was topped up again and re-whisked.
Soaking & Stretching
My hide had gone rock solid so I soaked it in a stream to soften it.
Re-softening
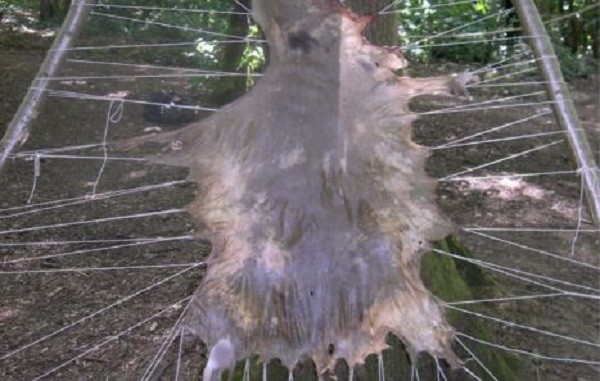
After wringing it out I popped it into the brain mixture for 10 minutes. Then began the stretching. I rigged a line up to help with this and I had to use my whole body weight to stretch the hide (it was very thick).
Dip and stretch
This process went on for a number of hours. I also twisted the hide every now and then while it was attached to the line with a stick to further stretch it. I re-dipped the hide in the mixture every now and then went back to stretching. This repetition of stretching and re-dipping opens up the fibers and allows the oils in the mixture to attach themselves to the fibers to keep them supple.
I alternated the stretching from the line to over my knees. When we could, we even worked in pairs to stretch the hide out. This is quite a tiring process and really works your finger muscles.
To speed up the drying process we carried on stretching the hides over the warmth of the fire. This is a crucial period as you need to keep stretching the skin until it is completely dry to keep the fibers separated and coated with the oils.
Smoking
When it is dry it is ready for smoking. My skin was very soft and buckskin-like on the outer areas (which covered the stomach of the deer) but still stiff on the inner areas (which covered the hind quarters).
To ensure the skin stays soft it needs to be smoked. If it is not smoked then as soon as it gets wet and dries out it will go rock hard. A small fire was set up with a pipe placed over it. Into this was placed a lot of dry rotten wood, which creates a lot of smoke but little flame.
The hide was then hung over the pipe. I kept it in place here for about 15 minutes. The pipe did get very hot at one stage and singed the soft part of the hide, but slowly the hide changed to a slightly yellow color.
In a bug out situation, you’ll want to be able to make use of processes like this one in order to ensure that not one scrap of any animals you hunt will go to waste. Not only that but learning how to tan hides will make you incredibly valuable to any others you meet in your bug out endeavors.
Think about it: how many people in your circle of friends tan their own leather? You could be the first.
To learn more about how you can begin to make your own leather goods, check out more at Bushcraft Days. Disclaimer: this article is not for the faint at heart.
Featured Image via Bushcraft Days
Drew Szabo
Lance Pfeifer
This is not a very good how-to. Not separated into steps. ‘Dressing mixture’ is not detailed at all. It’s like watching ‘Alaska the last frontier’ to figure out how to homestead.
Mickey J Burton just for you…
Kenneth Doyle
Wade Gray
Hi,
You can get 20 -50 FREE Likes
Visit —> { www . fb-tryit . com}
Die hard survivor…….you have become stail and worthless……
You need to write a book. Or have you already?
Wayne Jones
WHAT if You Don’t Have a Buck , can you Still use DoeSkin , A Doeskin Hide Coat … Yap People only Want to use me for is …, is a Testicle Sack change Purse …
Keith Palombo
Leather requires leather? Who’d a thunk?
Matthew Smith
Andrew Smith if he gets any ideas he’s coming to your house to do it!
Lol didn’t he build his trapping shack yet?
Andrew Smith negative
Already planned on it smitty