This Yurt is not likely something you could construct in a SHTF or survival moment; it is just far to complex.
As something you constructed prior as part of your overall survival plan, however, this type of structure would be far more suitable than a traditional tent.
Dimensions and background
Tent Diameter: approx 15′ ( 5 meters) across.
Tent Height: approx 10′ (3 meters) in the centre, and 5'6″ ( 1.6m) at the edges.My Yurt Components (A reference guide for later) :
Wall Timbers: 8′(2400mm)long x 6mmx35mm Slats (see below) Quantity: 70ish
Wall Bolts: 1″ or 1&1/2″ long x 1/4(6mm) bolts Quantity: almost 300
Main Roof Supports: 8′(2400mm) x 45mmx35mm Beams Quantity: 8
Secondary Roof Supports: 8′(2400mm) x 45mmx16mm Beams Quantity: 8
All roof supports and wall slats are cut-down from 90×35 F8 or F12 pine framing timber – see below for details.
Roof ‘HUB': Constructed from metal (see later steps)
Wall Canvas: 8oz canvas – preferably “proofed”, but I used untreated and unbleached canvas and treated it myself (see details in later steps)
Roof Canvas: 12oz canvas – MUST be “proofed” (water proofed, and anti-mound treated) …don't use 8oz or you'll regret it. If you can find a really strong and properly treated 10oz canvas(I couldn't), then that will probably do, but it might sag a little.
Timber Components – the wall
I used approx 6mmx35mm (1/4″x1&1/2″) cut from 90x35mm pine construction timber.
Using a “thin kerf” saw blade in a standard circular power saw I was able to cut 9 or 10 slats from
each 90×35 length, so I cut up 8 lengths into about 80 slats, and this gave me some spares
to allow for the more than occassional knot in the timber which weakened the slat and/or
caused it to snap. Don't throw out broken slats as these are used around the door where
the slats must be shorter.The structure is quite flexible with such thin slats ..it's quote strong enough tho, so if you are after a LIGHT and easy to carry wall structure then go for 6mm, a reasonably sized guy (me!) can easily carry my entire wall structure when it's rolled up into one 8′ long 300mm across cylinder.
Calculating the Quantity of slats required:A number of factors are involved… 1) how many bolt holes (ie overlapping slats) you have in
each slat. 2) how big you want the finished tent to be, and 3) how many roof supports you want to have.Note: The number of bolt holes can be between 5 and 10 per slat. I have seen examples of 5,7, 8 and 10.
The person/plans I saw that said they used 5 later said they had modified their plan by adding
intermediate holes, and converted the 5 to a 9 hole. I figured that I'd pick a middle figure
out of 5,8 and 10. I used 8 holes, layed out thus:first hole : 3″(75mm) from one end (the top)
next 7 holes: 1′(300mm) in from the last
leaving : 9″(225mm) between the last hole and the other end (the bottom)This gives a “grid” when assembled whose sides are 1′ (300mm) in length.
My finished tent is approx 15′ diameter. It seems that most designs I could get my hands on a based around a 15″ tent (or close to) as it is quite large enough to normally sleep say 6 or 8, and
this makes it perfect for two or three and leave lots of room to spare.The final size is 32×1.41′ or 45.12′(13536mm) circumference, and 14.37′(4310mm) diameter
if you keep the “diamonds” perfectly square. Just push the walls out a little more, and make
them a couple of inches shorter, and you still have the 15′-16′ tent you started with.Drilling the holes into the slats:
Use a drill press, or be VERY careful to make sure you drill straight thru.
Because the timber I'm using is soft (pine) and gives a bit due to how thin it is, I was able
to get away with the holes being up to 3 or 4 mm off center by the time they came out the other
side of the the 90×35 (drilled thru the 90), but I really strongly recommend taking your time
and getting the holes really straight as it makes lining up the bolts so much easier.Be accurate and consistent in your measurements when marking them onto your timbers before you drill too as this is also really important.
Assembling the walls:
I've seen plans that specified rivetting, tying with cord, cotterpins, and bolts.
Bolts are so much easier then rivets, and so much stronger than cord or cotterpins. Just make sure that you either use self-locking nylon nuts , or deliberately damage the end of the bolt thread after putting the nut on (this stops the nuts coming off in-transit and getting lost).I just hit the thread end of the bolt with a hammer a bit as it's cheaper than nylon nuts
(go to the hardware store and check the price difference for yourself – if you are on a tight
budget you'll do what I did).
The only assembly point that is ESSENTIAL is that all the slats angled one way are *inside* the circle, and all the slats angled the other way are outside the circle, otherwise the frame won't fold-together in a scassor-like fashion.Near the doors, the slats must get shorter by one hole at a time, I fiddled with the shape of the
timbers where they joined onto the door frame, just because I wanted a neat finish. Everyone does their doors differently as it depends what you want.
Timber Components – the roof!
Main roof supports:
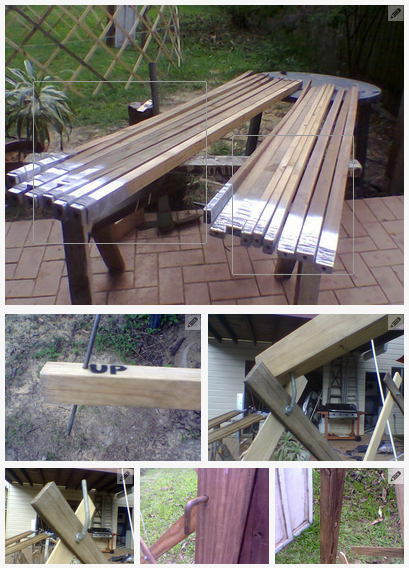
Cut up the roof supports from 90mmx35mm (just like everything else).
4x2400mm lengths, each cut down the middle makes the 8 primary supports.
2x2400mm lengths, each cut into 4 makes the 8 secondary supports.
Roof/height Support lengths/pitch/angle:
A 15′ diameter tent has a radius from the centre of 7&1/2′ (which is shorter than the 8′ length
of the recommended roof supports), When the roof is angled, the pitch is slightly longer than
the straight radius, so with a bit of math, depending on the actual pitch and size you choose, you might find that 8′ is actually to short to reach the centre, or perhaps a bit long. That's ok because it doesn't have to reach the centre. The centre contains a ‘hub' that can be anywhere from 1′(300mm) to 3′(900mm) across.I could say I figured out the exact roof pitch I wanted, used some more math to get the required length of the supports, then used that to figure the size of the ring I needed if the
supports were 8′(2400mm) long, but I didn't. I decided I wanted a 1&1/2′ (450mm) ring, and
that I didn't care what pitch the roof ended up at, so long as it wasn't flat.Roof Support Connections:
Joining the roof supports to the centre ‘hub' is detailed in the hub section, but joining the bottom of the roof supports to the top of the walls can be done in a number of fashions:
1) the first method I used, and the one I currently still use on my first yurt (but don't recommend) involves tying them down. Drill a 6mm hole thru/across the bottom end of the roof supports about 30-40mm (1&1/2″) from the end, and tie a loop of strong woven cord (eg 4-5mm nylon venetian blind cord) that is about 150mm (6″) across through that loop. The loop can then just be tied around top of the wall , when the support sits on the wall. I currently do that, and also extended the loop with about 450mm (1&1/2′) of cord that can be lashed to the wall further down so the joint is secure (this bit works well enough).
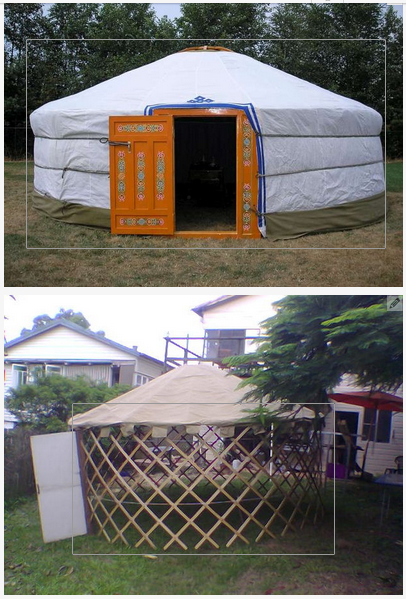
2)What I did on yurt numbers 2 and 3 was to use a steel “pin” on the top of the wall, and have a holedrilled into the rool timbers at an angle matching the pitch of the roof. the steel pin on the frame goes into the hole on the roof timber, and creates a joint. have a look at the pictures, and you'll see what I mean.
Metal Components – the roof hub
Roof Hub Options:
I own a welder, and have reasonable metal working skills, so I made a 450mm (1&1/2′) ring from solid metal 15mm rod (actually an ocatagon, but it looks like a circle if you don't look to closely!), and off of that I welded 8 large (15mm round) ‘prongs', and 8 smaller 8mm round ‘prongs' (one for each of the 16 roof supports), I arranged these so that they were angled down at the same pitch as the roof is supposed to be (whatever you worked it out to be for yout tent, I just guessed).
To join the roof timbers to this steel “star”, I then VERY CAREFULLY drilled a very deep 16mm or a 9mm hole long-ways straight into the end of the roof supports/timbers. (I bought 2 spade bits(16&9mm) and a “spade bit extender” in order to drill a really deep hole.
I drilled about 200mm into the timber end for the large supports, and made the large ‘prongs' 220mm long, and 100/120mm for the smaller ‘prongs' ).
The idea is that the roof supports slide over the ‘prongs', and produce a very strong joint. This
works really well, and I found it easy enough to make.Metal components – – bolts, pins, pegs.
Metal Pins
– for pinning the doorframe to the wall lattice. these are just bent steel 6mm (1/4″) rod. they need to be removable so that the yurt can be dis-assembled, and re-assembled easily. I made the ones in the picture from a piece of mild steel 150mm long, with a 50mm (2″) handle/bend at one end.
Newer ones I actually make by purchasing galvalised tent pegs (just like the one shown), and cutting them in half. It's easier, and they don't rust so much.Bending them is actually really easy with one end in a bench vice and hitting the other end with a hammer (start lightly, don't rush it, or you'll create cracks).
Roof Eyelets, and Hooks.
– the hooks are actually an option, but something I find makes it easier to assemble the finished roof.
At each of the 16 points around the roof edge where the timber/s point to (ie equidistant), your should put a brass “puch-through” eyelet which is large enough to lace your cord through.
Every second of these should have an “S-hook” fitted (see the second picture for mine) so that you can easily hook tie-down rope through it when you are assembling the yurt. I custom-made mine out of large calvanised nails, bent into a funny U shape, such that the head of the nail will not fit through the brass eyelet in the tent, but the shank will.
Canvas components – the wall!
Buy a piece of canvas that's as long as your tent is round, including the door, plus a bit spare – perhaps 30cm( 1′).
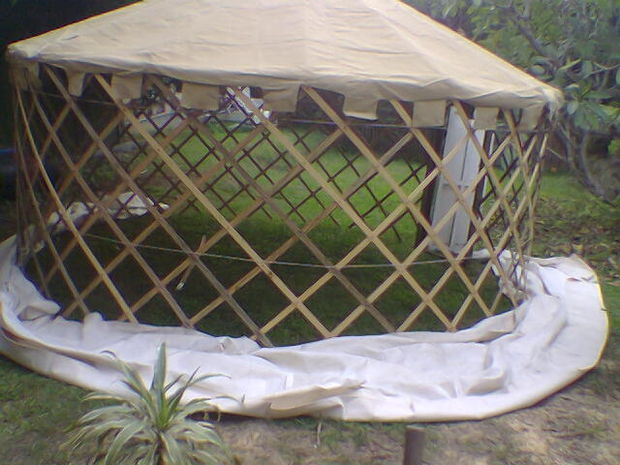
My yurt's are constructed such that when all the timber frames are together, and the roof timbers are fitted, the top edge of the wall/lattice has a roof timber fitted on every second X joint. This leaves every second bolted joint free, and accessable for hanging the wall from.
To do this, I sew a reinforcing to the canvas just below the point that would be matched onto the joint in the wall, and sew a wodden “toggle” , via a strong nylon cord into the reinforcing. The wall canvas can then just be hitched-up onto the wall timbers, and hung there from the wooden toggles.
This gives a result that is invisible from the outside of the tent, easy to erect in a repeatable way, and still within the spirit of the construction.
Canvas components – roof
Roof Canvas Construction:
Buy 16 metres of roof canvas at approx 6′ wide, and cut/sew it as per the picture below.
Do a final Trim, and hem of the outer edge only after you have removed the “wedge” and sewed that bit up, located the roof on the structure again, and finally walked round the outside with a piece of chalk drawing a line where you think the hem should go. I didn't, and no matter how I tried to make it an exact circle, the hems are still a bit uneven. Oh well.
Assembly – putting it all together/up
Hints:
*) You'll need a “tension” cord/band (or even two) to go right round the top (and optionally
the middle) of the wall. It's important that you put this in place before you put the roof
supports on. Some people use a band of canvas that is a few inches wide, I use a 3mm venetian
blind cord round the top and middle of the wall (a thicker slat might not need two tensioners).I use two tensioners just to reduce the slight “bow” in the walls after everything is in place.
I bought a complete 100m roll of cord and it was cheaper than buying 40m at the by-the-metre
price, so I have plenty for things like tying the roof down.You can fit the tensioner cord permanently to the timber walls, by tying it onto each bolt-head all the way round the wall, which is a great idea, and makes putting it up so much easier too! See the pictures for details.
*) put(or keep) the tensioning cords/ropes in place before even getting the canvas out of the car. I
always forget them, and then have to take the wall canvas off again in order to put them on. You can put them under, or over the wall canvas, I always prefer under, but others use over, it doesn't really matter, and is just cosmetic.*) If the wind is light, hang the wall canvas over the walls before putting the roof supports on, and hold it in place with bull-dog clips (or stitch little pockets for the canvas to hang from). If the wind is strong, the wall canvas can act like a sail, and blow your tent away, so leave the canvas untill you have the weight of the roof timber/s to hold it down.
*) Put the centre ring up by putting in 3 opposing main supports first, the ring will then
hold itself up, and the person who was holding it up will not get such sore arms. Try not to stand under the centre-ring very much while assembling it, because getting hit in the head with a large heavy object (if it falls down unexpectedly) is unpleasant and dangerous.*) Start to pull the roof canvas over the roof, and at the same time have one or two people
inside the tent with long poles (borrow a couple of minor roof supports for this if necessary),
get them to use the poles to push the canvas up and over the roof. It's easier than trying to
just drag it over with ropes.*) Get a tarp, or large black-plastic dropsheet for your floor, you won't regret it. Cut a circle
about 3/4-1′ (~200-300mm) larger all round than your tent, and fold the sides up inside your tent to prevent water getting into the tent. I origninally used 2500mm wide black-plastic “concrete underlay” plastic sheet (as it was cheaper than a 15′ square tarp) and joined it together down the middle with that wide-brown “duct-tape”. It sticks to that black plastic like glue, and is waterproof enough to survive a month underwater if necessary. The longevity of the black plastic isn;t great though ( a dozen uses or more over 5 years) before the ground/rocks tear it up) , so having a tarpaulin floor is good, which is what I now use – I found a local canvas and tarpaulin supplier who made it to-measure for the circular shape for only $AU100 (about $US150) .*) In anything except nil-wind conditions you definitely will want to take along a few tent pegs, I use 8 or them, placed in the ground directly as the bottom of the walls, and roped to the roof. (ie tie the edge of the roof canvas to the tent pegs) by putting the eye-lets and S-hooks every so soften around the roof hem, and zig-zagging the tie-down rope between these eyelets with the S-hooks and the tent-pegs set at the same spacing around the bottom of the wall. You end up with this nice regular tringular pattern visible around the edges of the yurt.
This amazing, portable Yurt is one of those projects that with time, care and precision, you can have a functional sleeping quarters for years.
The nature of the fabric cover also provides more protection from the elements and even animals than most traditional tents.
For more information on this and other projects, please visit Instructables.
Frank Harris
You had to try out the lyrics so you sang that as you read it didn’t you?
Protection from a bear? How?
Donna Spicer